Apache Kafka Connector – Mule 4

Apache Kafka is a multipurpose application. Integration with Apache Kafka relies on the applications that are typically used with it.

Example use cases include:

  • An integration application that ensures that patients in a hospital receive the care they need in a timely manner
    An example of this is a hospital server that processes emergency requests for patient admissions. The requests are ordered by priority determined by specified criteria, such as how critical the patient’s condition is and the staff that is available to treat the patient. In this scenario, an application processes Apache Kafka messages in the order that they are received, relying on the order and idempotency of the messages sent through the queue.
  • An application that is time-sensitive More info Mule Training
    An example is a newsroom that uses the Apache Kafka system to deliver the latest news. To retrieve the latest news, reading from the Apache Kafka queue sometimes requires reading from the end of the queue first.
  • Multiple applications that rely on the information provided by Apache Kafka
    For example, a department store uses a website activity tracker to improve the online shopping experience. The data that is gathered is sent to multiple departments for various computations. Each department reviews the information that’s received to stay informed about what the customer is looking for and then provides recommendations accordingly.

Use Flow Designer to Configure Apache Kafka Connector – Mule 4

Configure the Trigger

  1. In Design Center, click Create new.
  2. Click Create new application.
  3. Enter a Project name, and select the Target Environment.
  4. Click Create.
  5. Click Go straight to canvas to exit from Let’s get started.
  6. Click the name of the trigger card.
  7. If you are using the Anypoint Connector for Apache Kafka (Apache Kafka Connector) as a trigger, search for the connector; otherwise, search for HTTP Listener or Scheduler.
  8. Select the source.
    Apache Kafka Connector provides Batch message listener and Message listener as sources

To get in-depth knowledge, enroll for a live free demo on Mulesoft training

Mule Deploying to Amazon EC2

The EC2 plugin allows you to create Amazon machine instances (AMIs) of your existing Tomcat instances and deploy them to EC2 via the Tcat Server console. This page describes how to install the plug-in, create the AMI, and deploy it. If you want to use an existing, fully configured cloud implementation of Tomcat instead of creating and deploying your own instance, see Using Cloudcat with Amazon EC2 instead.

Installing the Plug-in

To install the EC2 plug-in, simply download it from the Tcat Server download page and copy it to your TCAT_HOME/webapps/console/WEB-INF/plugins directory. This directory must be owned and have the same permissions as TOMCAT_USER. When you run the administration console, the Amazon EC2 tab will appear.

If you are using Mule iBeans, you must delete the mule-ibeans/lib/modules/deployed/ibeans-module-spring-1.0-beta-9-full.jar to enable iBeans and the EC2 plugin to work in the same instance of Tcat Server.

Creating an Amazon EC2 Account

Before you can get started, you must create an Amazon EC2 account. Note your access key ID and secret key. If you have an existing account, you can find them by logging into the EC2 website, clicking Your Account, and selecting Security Credentials.

You also need to create a key pair if you do not already have one. To do this, log into the EC2 Console, click Key-Pairs on the left, click the Create Key Pair button, and then enter a key pair name. Learn more info Mulesoft Training

Opening Ports

By default, Amazon creates a firewall that prevents any communication from happening between the outside world and your EC2 instances. To change this, you must download the EC2 tools so you can open ports. You then issue the following commands:

$ ec2-authorize -p 8080 default
$ ec2-authorize -p 51433 default

Amazon Machine Images

Amazon Machine Images (AMIs) are images that get provisioned to each EC2 instance. You should familiarize yourself with the AMI concepts in the EC2 documentation before proceeding.

You want to create your own AMI with a Tcat Server instance on it. For testing purposes, we provide an image with Tcat Server and Ubuntu 9.04 from Alestic. On startup, this image starts Tcat Server and makes it available on port 8080. Note that we provide this image on an unsupported basis solely for testing, and the image ID and details of this image may change in the future. The test image ID is: ami-f7d8389e

Using the Plugin

The Amazon EC2 tab in the Tcat Server administration console allows you to manage your EC2 accounts and instances. The first step is to create the account, and then you create your instances.

To create the account:

  1. On the Amazon EC2 tab, click New Account.
  2. Enter a name for the account, your Amazon access key ID, your secret key, and the name of the key pair you created.
  3. Click OK. Learn more skills from Mule Training
new ec2 instance

To create an instance:

  1. On the Amazon EC2 tab, click New Instance.
  2. Select the Amazon account you created.
  3. Enter the number of EC2 instances you want to create.
  4. Enter the name of the server (instance). If you are creating multiple instances, you can use the {host} variable to insert the name of the host into the instance name, such as MyHost-{host}.
  5. Enter the ID of the AMI you created, or use the test AMI ID
  6. Specify the instance type (size). This affects how much your Amazon account is charged.
  7. Enter the name of the key pair to use with these servers.
  8. If you want to automatically register these instances with your Tcat Server administration console, so that you can manage these Tcat Server instances, select the Auto Register Server check box.
  9. Enter the URL path where you want the Tcat Server agent WAR to reside. By default, set this to /agent.
  10. Enter the port to use for the Tcat Server agent.
  11. Select any server groups you want to add these new servers to.
  12. Click Add.

After the plug-in issues a new instance request, it takes a while for Amazon to provision the image. The instances list displays “pending” until the image is created, at which point it displays “running”. Your new Tcat Server instance is then available on the Servers tab if you opted to automatically register it.

Creating a Tcat Server AMI

If you are deploying Tcat Server to a production environment, typically you create your own AMI with Tcat Server on it.

Configuring Tcat Server for Automatic Startup on Your AMI

To ensure that you can automatically register your new Tcat Server instance, you should configure the Tcat Server instance on your AMI to start automatically on server startup. On Linux, you can do this through an init script.

  1. Install Tcat Server (or Tomcat and the Tcat Server agent WAR) into your /usr/local/tcat directory.
  2. Download this init script to /etc/init.d/tomcat.
  3. Execute chmod +x /etc/init.d/tomcat.
  4. Execute chmod +x /usr/local/tcat/conf/tomcat-env.sh.
  5. Execute the update-rc.d tomcat defaults command. This configures Ubuntu to run the init script on startup.
  6. If you install Tcat Server in a different location, edit the /etc/init.d/tomcat script APP_ENV variable to reflect where Tcat Server is installed.

To get in-depth knowledge, enroll for a live free demo on Mulesoft Online Training

Microsoft Azure DevOps Integration for Agile Development

Enable bidirectional synchronization of records between Microsoft Azure DevOps with ServiceNow Agile Development 2.0 by integrating the two applications.

For example, if you update a record in Azure DevOps, the update is reflected in Agile Development. Similarly, if you update a record in Agile Development, the update is reflected in Azure DevOps.

ServiceNow Azure DevOps Integration | Azure DevOps Integration Tool

Integration of Azure DevOps with Agile Development enables you to do the following:

  • View available Azure DevOps projects in Agile Development.
  • Perform a bulk import of records from Azure DevOps to Agile Development.
  • Perform single record updates between Azure DevOps and Agile Development.
  • Avoid duplicating record update entries in Azure DevOps and Agile Development.
  • Plan, track, and update your tasks from a single application.

Install Microsoft Azure DevOps Integration for Agile Development

Install the Microsoft Azure DevOps Integration for Agile Development (sn_agile_ado_int) application from ServiceNow Store.

Role required: adminNote: Activation of the Agile Development 2.0, ServiceNow Integration Hub Starter Pack Installer, and Azure DevOps Board Spoke plugins on production instances may require separate licenses. Contact ServiceNow Customer Support for details. For more info Servicenow Training

Procedure:

  1. Navigate to the ServiceNow Store.
  2. In the ServiceNow Store, search for Microsoft Azure DevOps Integration for Agile Development
  3. Click the application tile.You can view detailed information of the application.Note: Consider reading the Other Requirements and Dependencies sections, as applicable.
  4. Click Get and enter your HI login credentials.
  5. Click Request Install.
  6. In the Instance Name field, enter your details and click Validate Instance.
  7. In the Reason for the Instance field, enter your details and click Request.You receive an email with detailed installation instructions.
  8. Log in to the instance on which you want to install the Microsoft Azure DevOps Integration for Agile Development application.
  9. Select System Applications > Applications.
  10. Locate the application, select it, and click Install.

Connect Agile Development and Azure DevOps

Establish a connection between Agile Development and Azure DevOps using the sn_ado_int.user role.

Create an Azure DevOps connection alias

Create a Basic Auth credential and an HTTP(s) connection which will together be used as a connection alias to establish a connection with Azure DevOps.

Procedure

  1. Create a Connection & Credential alias
  2. Create Basic authentication credentials.
  3. Create Create an HTTP(s) connection Create an HTTP(s) connection.Note:
    • A connection alias (sn_ado_int.Azure_DevOps) is available by default.
    • You must create a connection alias for every Azure DevOps organisation that you use.

What to do next Create an Azure DevOps instance.

Create an Azure DevOps instance

Create an Azure DevOps instance record using the connection alias that you created. This instance is used to establish an integration between Agile Development and Azure DevOps.

Procedure:

  1. Navigate to Agile Azure DevOps Integration > Azure DevOps Instances.
  2. Click New.
  3. On the form, fill in the fields.
  4. Click Submit

To get in-depth knowledge, enroll for a live demo on Servicenow Online Training

Tableau’s New ETL Tool: Tableau Prep

Admit it, in order to analyze your data, you’ve spent hours porting data into Excel to fix/modify it, filter out irrelevant, bad or test records, enhanced the data by adding additional fields from other data sources using vlookup, added calculated fields, etc. And once tomorrow’s, next week’s, or next month’s data arrives, you have to do it all over again.

Tableau is Changing Face of ETL

At the 2016 Tableau Conference, Tableau gave a demonstration of an ETL tool called Project Maestro (as of release in April 2018 it is called Tableau Prep), which they were in the process of developing. I’ve been impatiently waiting to get my hands on it ever since. Recently, I was invited to do Alpha and Beta testing of Tableau Prep and I am excited to share with you what Tableau Prep is doing (as of Beta version 1.0) for data management.

What is Tableau Prep?

Enter Tableau Prep. In order to be able to answer questions with your data, you must have data that is accurate and clean.

Tableau Prep is an ETL tool (Extract Transform and Load) that allows you to extract data from a variety of sources, transform that data, and then output that data to a Tableau Data Extract (using the new Hyper database as the extract engine) for analysis.

How Does Tableau Prep Work?

Tableau Prep helps you examine and visualize your data, enabling you to do the following:

  1. Connect and extract data 
  2. Understand data:
    1. Number of columns/fields in your data
    2. Number of records
    3. Data types of fields
    4. Number of distinct values in a field
    5. Visualize how the data is distributed by field
  3. Identify issues and errors 
  4. Clean/Modify and Filter data
    1. Rename fields
    2. Remove fields
    3. Modify/change values in a field
    4. Split fields
    5. Aggregate data
    6. Filter out data
  5. Enhance data
    1. Add Calculated fields
    2. Join additional data
    3. Union additional data
  6. Output resulting data for use in analysis and reporting

And, once you get new data (as long as it is in the same format and same field names), the ETL process you created is reusable. No longer will you have to repeat the process and steps necessary to transform your data each time the source data is updated, instead the ETL process flow has all the steps and logic you built. All you need to do is re-run the flow to get the new data output, resulting in many hours saved from data processing and cleansing, which can be used for analysis instead!

Tableau Prep is fairly intuitive, allowing you to visually see the steps of your ETL process from extracting data from the source(s), to data profiling, modifying and enhancing, to output. It uses common functionality such as drag and dropdouble click to edit, and drop down menus to select actions to be performed.

Connect to Your Data

As mentioned previously, Tableau Prep allows you to extract data from numerous sources:

  • Microsoft Excel
  • Text File
  • Amazon Aurora
  • Amazon Redshift
  • Aster Database
  • Denodo
  • EXASOL
  • Google Cloud SQL
  • HP Vertica
  • Kognitio
  • MemSQL
  • Microsoft SQL Server
  • MySQL
  • Oracle
  • Pivotal Greenplum Database
  • PostgreSQL
  • Teradata

Once connected to your data, you can:

  • See field names in the data
  • See sample values of those fields
  • See datatype of each field – For Text Files only, you can right click on the data type to modify it
  • Exclude fields – uncheck the box next to the name to exclude the field
  • Filter the data – right clicking on a field name allows you to create a formula to include/exclude records based on the formula (If you are already familiar with Tableau most of the functions you use for Calculated fields are available). Click on the Filters tab allows you to see all the filters you have created.

Depending on the data source, other options might be available. For Text Files, you can select:

  1. Whether the first line contains header or to Generate field names automatically;
  2. Field Separator;
  3. Text Qualifier;
  4. Character set;
  5. Locale For more info ETL Testing Certification

Example of a Text File connection:

Example of a Text File connection in Tableau ETL Maestro

Example of Filtering data in a Text File (exclude all records where the Dest State is Alaska):

Example of Filtering data in a Text File (exclude all records where the Dest State is Alaska)

Example of seeing filters that have been applied to a Text File by selecting the filter tab.

Example of seeing filters that have been applied to a Text File by selecting the filter tab.

Example of how you can change a data type in a Text File:

Example of how you can change a data type in a Text File in Tableau ETL Maestro

Example of connection to Redshift selecting a specific table (Note: you can select one table, and later use Tableau Prep to Join or Union other tables (or files), or you can select Custom SQL and create your own SQL statement which joins/unions various tables as needed to get the data you desire):

Example of connection to Redshift selecting a specific table in Tableau ETL Maestro

Example of connection to Redshift using Custom SQL:

Example of connection to Redshift using Custom SQL in Tableau ETL Maestro

Understand Your Data

After you’ve connected to your data, Tableau Prep lets you see and analyze your data quickly, perform data profiling, visualize how the data is distributed, and allows you to quickly identify issues. In the example below, you can see:

  • The data being examined has 9 columns and 126K rows (see yellow arrow)
  • The column Airline Description has 17 distinct values (see blue arrow)
  • For the field Dest State (see grey arrows), you can easily see that California is the most frequent value for Dest State (Notice the grey bar over California, which is much longer than any other State. In addition, just to the right of that, you see a miniature bar chart which shows all the States (not just the 12 of 52 displayed) and from that you can see California is the most frequent value for all Dest States in the data set)
Data Profiling in Tableau ETL Maestro

Details about how many records have a specific value (hovering over Southwest Airlines Co..:WN in the Airline Description field shows there are 29,160 records with this value)

Details about how many records have a specific value (hovering over Southwest Airlines Co..:WN in the Airline Description field shows there are 29,160 records with this value)

See record level details when you select a value from a field. In the example below Delta Air Lines Inc., from the Airline Description field was selected.

See record level details when you select a value from a field. In example below Delta Air Lines Inc., from Airline Description field was selected.

You can quickly see that Georgia, in the field Dest State, has the most records associated with the Delta Air Lines Inc. selection, as indicated by the length of the light blue bar compared to California, Florida, and the other States displayed in the Dest State field. In addition, the Distance for these records mainly fall between 0 and <1250 miles (again identified by the length of the light blue bars in the Distance field).

Identify Issues and Errors

As you analyze your data and how it is distributed, you may identify issues or errors. For example:

  • Southwest Airlines has four different ways of being displayed (see yellow arrows):
    • _Southwest Airlines:WN
    • southwest airlines co.:WN
    • Southwest Airlines Co.:WN
    • Southwest Airlines:WN
Issues or Error Example in Tableau ETL Maestro

Using Tableau Prep’s data view allows you to quickly identify:

  • Bad data that needs to be cleaned or removed
  • Inconsistent data (data that doesn’t follow naming conventions, has typos, etc.)
  • Outliers that may not be relevant to your analysis

Clean/Modify and Filter the Data

Once you find an issue with your data Tableau Prep can help you clean/modify or remove it.

In the example above, we found there are four versions of Southwest Airlines, and Tableau Prep offers three different ways to fix this.

  1. Click on the value to be changed, and select “Edit Value” and modify it to what you desire and all records with that original value will be modified to the new value.
  2. Click on the correct value and then select Group and Replace – Manual Select from the field menu. A new window appears with all the distinct values in the field. Select the values that should be changed to the value selected initially. All related records for all the values selected will be modified to the initial value selected.
  3. Select Group and Replace – Pronunciation from the field menu. Tableau Prep will look through all the distinct values and using machine learning, it will find values that are similar in pronunciation and group them into one value. You then have the option of looking at the grouping(s) and revising as needed (you can remove a value from the group if it doesn’t belong). In the example below, using the Group and Replace – Pronunciation, the Southwest Airlines values have been grouped together and the Unknown values have been grouped together, all done automatically. Pretty slick!
Tableau ETL Maestro screenshot of selecting group and replacing

Another example is finding data that should be removed because it is bad, irrelevant, or test data. Records can easily be removed using Tableau Prep’s filtering. In the example below, we discover there are 192 rows that have a Flight Num of -99, which is an invalid Flight Number. Looking at the detail records we see they are all exactly the same (same Airline Description, Dest City, Dest State, Origin City, Origin State, Tail Num and all have a Distance of 0 miles). We don’t want to include this in our data, so we apply a filter by selecting Filter Values from the field menu. It brings up a window allowing you to create a formula to include/exclude records based on the formula (If you are already familiar with Tableau most of the functions you use for Calculated fields are available).

To get in-depth knowledge, enroll for a live free demo on ETL Testing Online Training

What Is ServiceNow? – A Cloud Solution For Your Enterprise

The IT sector today aims to achieve optimal efficiency. However, this is not an easy task as they face many roadblocks on the way. Legacy systems are still in use, which can slow them down considerably. In this what is ServiceNow blog, I’ll be going into how ServiceNow came into existence in the ITSM sector, as well as how it’s grown to become a full-fledged enterprise cloud solution.

Why ServiceNow?

ServiceNow had its roots set in ITSM since 2012. However, with changing technology and the advent of cloud, it created its niche as a cross-departmental platform which functions as an enterprise cloud solution which is built on top of all other applications. Its ability to create workflows which automate the process of data extraction makes it a unique offering in today’s cloud space. 

ServiceNow has a raving customer base which returns to its platform each year. Let’s now look at the different cloud deployment models and where ServiceNow fits in.

cloud_deployment_models-What is Servicenow-edureka

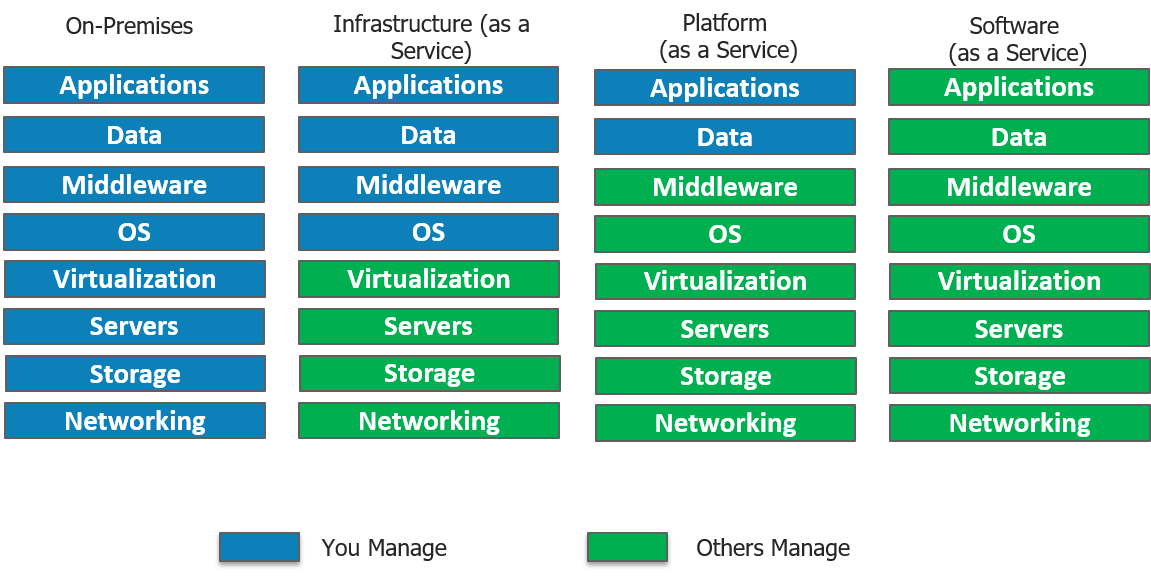
IaaS(Infrastructure as a service)

  • In short, IaaS gives you a server in the cloud(virtual machine) that you have complete control over.
  • In Iaas, you are responsible for managing everything from the Operating System on up to the application you are running. For more info Servicenow Training

PaaS(Platform as a Service)

  • With PaaS, you have a combination of flexibility and simplicity.
  • Flexible because it can be tailored to the application’s needs.
  • Simple as no need of OS maintenance, versions, patches.

SaaS(Software as a Service)

  • A software distribution model in which a third-party provider hosts applications.
  • Instead of installing and maintaining software, you simply access it via the Internet.
  • Automatic updates reduce the burden on in-house IT staff.

Where does ServiceNow fit in?

ServiceNow which started off on a SaaS model catering to ITSM, has also ventured into PaaS cloud model, in which the entire organization’s business processes can be managed by a single system of record. ServiceNow provides the infrastructure needed to perform data collection, storage, as well as application development all on a single platform. Although ServiceNow does not provide an in-house Iaas deployment model it does support integration to Microsoft Azure which is an IaaS model.

It offers configuration management database (CMDB) along with service mapping which powers service-aware applications. Service mapping shows the dependencies amongst the organization’s assets. This leads to much-needed visibility into the business environment.

Great, now let us try to address the most essential question of this blog, what is ServiceNow?

What Is ServiceNow?

ServiceNow was founded in 2004 and stepped foot in the ITSM (Information Technology Service Management) field and provided competition to established players like IBM and HP. Today it is not just limited to ITSM, even though it still forms a major part of its revenue. Now, it is has diversified into 5 major services which include IT, Security, HR Service Delivery, Customer Service and Business Applications. ServiceNow is an integrated cloud solution which combines all these services in a single system of record.

ServiceNow’s Vice President Dominic Phillips, in one of his keynotes, pointed out that while we are witnessing so much “disruption” in the consumer sector, there is a lack of efficiency in internal business workflows inside organizations.

In today’s digital era, the ease of access that Uber and Airbnb provide while booking a cab or reserving a table is the kind of experience ServiceNow wants to provide to its customers within the enterprise.

Let us now move forward to understand how ServiceNow works by looking at its architecture. Get more skills from Servicenow Developer Training

ServiceNow Architecture

The majority of cloud service offerings today, run on the age-old Multi-tenant architecture like AWS, Azure, Salesforce, Oracle, etc. The Multi-tenant architecture creates a single instance which serves multiple customers. This usually deals with complex databases which demand frequent maintenance, often leading to unavailability of resources to customers. This is why ServiceNow has adopted a Multi-instance architecture.

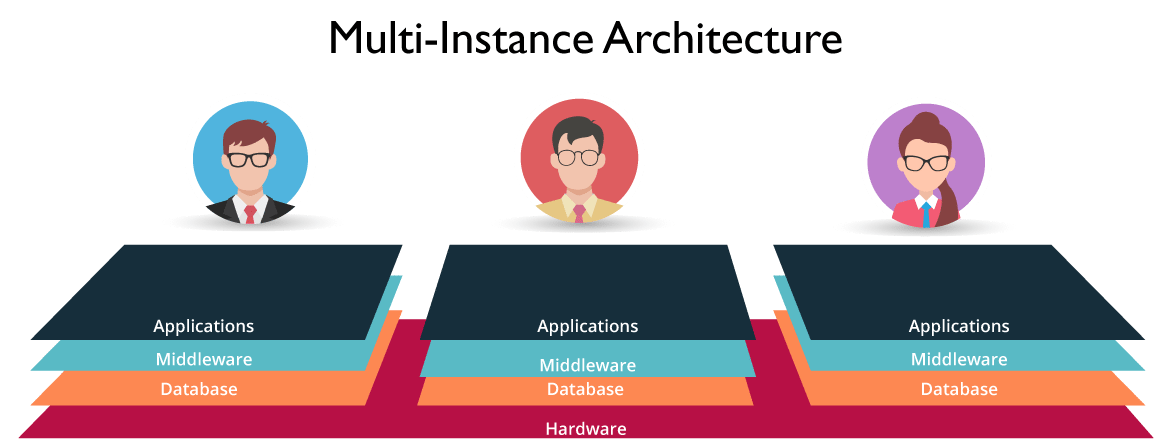
Multi-instance architecture: A unique instance is created for each employee which maintains a separate resource stack. This gives us the freedom to deal with each user’s specific needs, enabling us to deal on a customer-customer basis. E.g. customer upgrades can be deployed with respect to compliance requirements as well as the enterprise’s current needs.

In our diagram shown below, 3 customers have unique instances each with an isolated pool of resources. What this means is, while the hardware is shared, the software: Application, Middleware and Database are all separately maintained. Data Isolation is a huge advantage. This is why the performance of one customer is not influenced by another customers instance. Neat, isn’t it?

MultiInstance Architecture- What Is ServiceNow- Edureka

 Figure:  What Is ServiceNow – Multi-Instance Architecture

ServiceNow Applications

In this what is ServiceNow blog, let’s get an overview of the ServiceNow Applications.

IT Service Desk 

A report found that 15 hrs out of 45 hrs in a work week are spent doing non-work related tasks. It was identified that this is due to the outdated ITSM software in use.

In ServiceNow, employees are provided with a self-service portal where they can avail IT Services by messaging the concerned department staff. ServiceNow was able to bring the ease of use of social media apps to the ITSM sector which was still lagging behind with legacy systems.

With ConnectChat, the staff can reply in real time. This can be seen as an improvement over the traditional mailing system where messages had to be sent back and forth. This supports the sharing of files across departments. An employee can attach incident files as part of the conversation enabling technicians who can then directly look up the incident records and service the request. If a user is unsure which technician is on duty he can create a group with all technicians as members. Visual taskboards allow you to assign tasks to different departments with just a drag and drop gesture.

Resolving Security Threats

In spite of having a sophisticated security management mechanism in place for threat detection, when there is a security breach, most companies face an uphill task of resolving the problem.

ServiceNow uses structured workflows which helps prioritize risks based on their severity and their impact on the organization.

Threat research would normally take up to 45 minutes using spreadsheets and manual processing.

However, automated tools provide this information inside the platform which reduces the time involved to under 20 seconds.

HR Service Delivery

Ever wondered how HR spends most of its time doing repetitive tasks like employee onboarding when they should actually be focusing on strategic tasks instead?

ServiceNow wants to do away with all that manual processing. These tasks span across different departments like IT, Facilities, Legal and Finance. ServiceNow’s single platform can be used to connect HR workflows with all these departments. Decision making is made easy with its tracking and trending tools. HR is now powered with consumer-like customizable forms to deliver satisfactory service to employees.

Customer Service

The need of the hour is to provide uninterrupted quality service yet keeping the cost constraint in mind. ServiceNow is transforming Customer Service into a Team Sport. Unlike CRM(Customer Relationship Management) which is limited to customer engagement, ServiceNow Customer Service Management (CSM) operates by Connecting the right people, systems and workflows.

Customer Service is not limited to just resolving customer tickets. Whenever a customer is facing an issue, we need to find its root cause. This will reduce case(tickets) volume in the long run. ServiceNow comes with Service Mapping which provides cross-functional information to discover the initial point where the error was first noticed.

ServiceNow makes it easy to dispatch across different departments like engineering, field services, legal, etc. Take the example of the coffee maker that’s not working. The field agent is notified of its possible problem even before he starts his conversation with the customer. The customer is notified proactively with real-time notifications ensuring customer satisfaction and resolving issues at lightspeed.

Business Applications

ServiceNow comes with a drag and drop approach which allows you to customize Business Apps without writing a single line of code. For the experienced developer, you will never have to start from scratch again as you can choose from reusable components, workflows and link barriers across departments using information from the cloud.

Let’s now move ahead in this what is ServiceNow blog and understand what is a PDI.

Personal Developer Instances (PDI)

PDIs are meant for a walkthrough of the ServiceNow features. It can be used by developers, customers or even partners. The motive behind this instance is, it does not interfere with the production instance. Application ideas can be tested on PDI’s however, it will not be added to the final application repository.

Instances may be kept as long as there is regular activity. To be considered as active you need to either create applications or write scripts within 14 days. Now that we are aware of PDI’s, let’s move ahead and explore the ServiceNow Platform.

Creating A Personal Developer Instance(PDI)

To request a personal developer instance, the ServiceNow developer program provides you with a fully-functional instance, sized for single developer use. Let’s explore the two options to request a personal developer instance.

Step1: Log into the developer site at https://developer.servicenow.com

Create an Instance- What Is ServiceNow - Edureka

Step2: Request a PDI by doing any of the following actions.

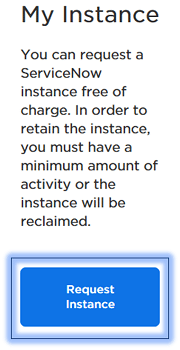
  • From the dashboard homepage, click Request Instance.

From any page on the developer site, navigate to Manage >> Instance and click Request Instance.

Manage An Instance- What Is ServiceNow - Edureka

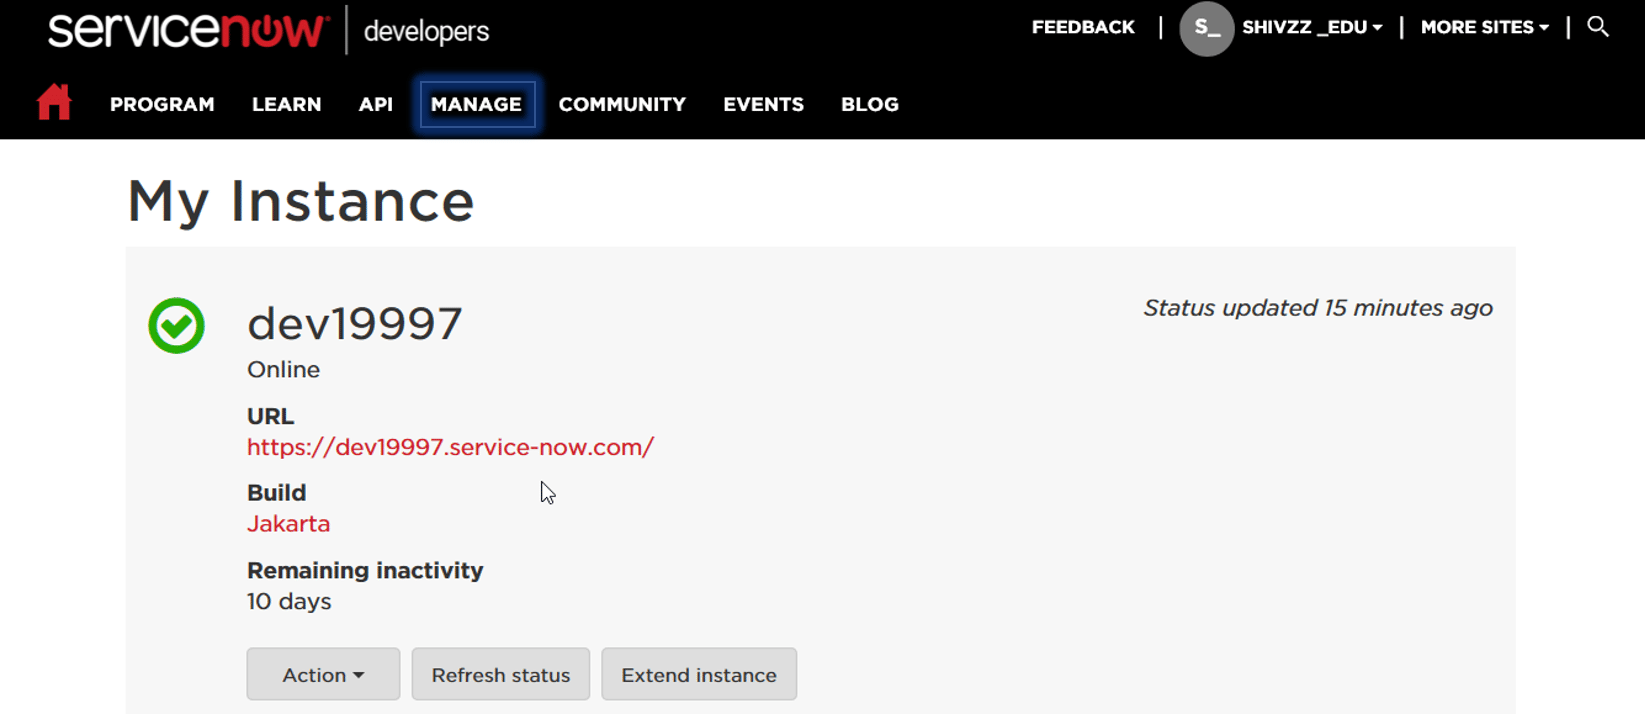
On successful registration, you will get an instance copy as shown above. You can click on the URL and login with your credentials. 

To get in-depth knowledge, enroll for a live free demo on Servicenow Online Training

SAP Integration With MuleSoft

As one of the most widely used enterprise resource planning solutions on the market, SAP plays a central role in the most critical business processes for many companies. In order to fully automate and optimize these business processes, companies need to integrate SAP with other applications within their organization. This article discusses SAP integration with other applications like Salesforce, e-POS, e-Commerce SharePoint etc. including uses and benefits, challenges, and new approaches.

Mule ESB – The Best Way to Integrate SAP

An alternative approach to point-to-point quick fixes and expensive SOA stacks is integrating SAP using an ESB (Enterprise Service Bus). ESBs provide a modern, lightweight, standalone solution for integrating SAP with other applications, including SaaS solutions like Salesforce, ePOS, e-Commerce, and SharePoint. Mule ESB is the only enterprise service bus to be certified by SAP for SAP integration. Mule’s SAP Enterprise Connector provides bidirectional communication and works with existing SAP technologies such as:

  1. Intermediate Documents (IDocs)
  2. Business Application Programming Interfaces (BAPIs)
  3. SAP Java Connector (JCo) For more info Mulesoft Training

Mule ESB SAP Connector

Mule ESB supports SAP integration through an SAP-certified Java connector. With the Mule Enterprise Gateway for SAP, integration between applications with SAP ECC is faster and easier. Mule SAP JCo Connector is a transport developed to provide bi-directional connectivity between SAP and other applications or tools. Using SAP JCo connector we can easily invoke BAPIs (Business Application Programming Interface) and iDocs (Intermediate Document Interface) in SAP. The SAP JCo connector is built using SAP Java Connector libraries provided by SAP. The connector leverages the SAP Java Connector (JCo) libraries, which enable Mule applications to:

  • Send and receive iDocs over tRFC and qRFC.
  • Transform all SAP objects (JCoFunction & IDocs) both to and from XML.
  • Execute Business Application Programming Interface (BAPI) functions using all of the following types of Remote Function Calls (RFC) like sRFC (synchronous RFC), tRFC (transactional RFC) and qRFC (queued RFC).
  • Act as a JCo Server to be called as a BAPI over the following protocols like sRFC, tRFC, and qRFC.

 The SAP connector establishes a connection to a SAP system using JCO libraries (provided by SAP). The Connector supports the option to configure SAP connection details, connection pooling, and max limit of active connections. If the connector is used for outbound data from SAP, then ESB registers the current Mule ESB instance as JCO destination/Gateway Server.

Image title

Integration for SAP BAPI Functions

A simple BAPI performs a single operation, such as retrieving a list of product master data. The adapter supports simple BAPI calls by representing each with a single business object schema. Simple BAPIs can be used for outbound or inbound processing. You can specify synchronous RFC processing or asynchronous transactional RFC (tRFC) processing when you configure a module for a simple BAPI. In addition, for outbound processing, you can specify asynchronous queued RFC (qRFC) processing, in which BAPIs are delivered to a predefined queue on the SAP server.

  • In synchronous RFC processing, the SAP server and the adapter must be available during processing.
  • In outbound processing, the message flow sends a request, then waits for a response from the SAP server.
  • In inbound processing, the SAP server sends a request through the adapter to an endpoint and waits for a response from the adapter.
  • In asynchronous tRFC outbound processing, the adapter associates a transaction ID with the function call to the SAP server. The adapter does not wait for a response from the SAP server. If the delivery is unsuccessful, the message flow can use the SAP transaction ID (TID) to make the request again. The TID is a field in your message.
  • In asynchronous tRFC inbound processing, the adapter does not have to be available when the SAP server runs the function call. The function call is placed on a list of functions to be invoked, and the call is attempted until it is successful. To send function calls from a user-defined outbound queue on the SAP server, you also specify asynchronous tRFC inbound processing.
  • In asynchronous qRFC outbound processing, the process is similar to asynchronous tRFC outbound processing. A TID is associated with the function call, and the adapter does not wait for a response from the SAP server. In addition, the BAPIs are delivered to a predefined queue on the SAP server. By sending BAPIs to the predefined queue, you can ensure the order in which they are delivered. Learn more skills from Mule Training

Integration for SAP IDocs Documents

The IDoc adapter is part of the Integration Server. Essentially, the IDoc adapter comprises two parts, namely an adapter at the Integration Server inbound channel, and an adapter at the Integration Server outbound channel. The metadata for the IDoc types involved is shared. The adapter at the inbound channel is located before the Integration Server pipeline and calls this pipeline.

The adapter at the outbound channel, however, is called by the pipeline, and can, therefore, be regarded as part of the pipeline. As part of ESB flow definition, a SAP inbound endpoint was used to receive iDocs from SAP. A new destination (Program ID) was created in SAP, the iDocs created in SAP were also published to the new destination. There are two processes in IDOC processing one is INBOUND PROCESS (IDOC coming to the system and its handling at various stages) and the other is OUTBOUND PROCESS (IDOC is sent to another system. Outbound data from SAP, in case of Price/VAT data from SAP, ESB receives iDocs as JCO iDocDocumentList elements. Each iDocDocument contains iDoc metadata and Segments which internally had the Segment data (Price or VAT information).

ESB can receive multiple iDocs at any time: inbound data to SAP, in case of Sales/Return Order from other application to SAP, Mule ESB converted payload to iDoc XML format using XML-to-iDoc transformer, and posted the request to SAP.

Support for Clustering, HA, Reliability, and Throttling

Mule ESB Enterprise can be clustered to support High Availability. The SAP adaptors are cluster-aware. The TID handler should be configured to use the database in case of Clustered ESB nodes to ensure that ESB does not process the same transaction twice. Reliability and Throttling were enabled by using Active MQ message broker using Mule ESB which provided an out of the box connector. Throttling was controlled through configurations such that Mule ESB processes load to a downstream system like POS, based on a response acknowledgment.

Batch Process and Tuning

It is possible for Mule ESB to handle a higher volume of data from SAP to support batch process. ESB received data from SAP and output to destination interfaces were throttled using Active MQ. ESB also provides options to tune the number of threads for processing.

Benefits to the Customer

When SAP is properly integrated with other applications, companies are able to streamline and fully automate their business processes. Companies further benefit from SAP integration in the following ways:

  • Increased Business Alignment: the ability to create an integrated agile software infrastructure for changing business needs.
  • Better Business Efficiency: the ability to streamline, automate, and enable a better tracking and visibility to business processes.
  • Improved Business Visibility: the ability to integrate systems and to aggregate data for a consistent and accurate view of business as a whole.
  • Significant cost savings by using low-cost Mule ESB Enterprise.
  • Support for functional and non-functional requirements.
  • Ability to generate reports in SAP based on regions and evaluate the sale across the world.
  • Improved customer interactions by automating direct communications.
  • Elimination of the need for dual data entry, saving time and money.
  • Fewer data redundancies and errors caused by manual data entry.
  • Enhanced agility to act on new information quickly.

SAP Integration Challenges

Although integration has been around for well over a decade, the specific challenge of integrating SAP with other system emerged much more recently. Moreover, traditional approaches to integration have been costly and complex. Direct, point-to-point integration, for instance, has been utilized in some cases as a quick, ad hoc solution to SAP integration challenges. However, such an approach creates tight dependencies between the two systems, resulting in a brittle environment and a progressively more complex architecture as new integration are added over time.

TO get in-depth knowledge, enroll for a live free demo on Mulesoft Online Training

Who is an ETL Developer? Roles and Responsibilities

The abbreviation ETL stands for Extract, Transform, and Load. It’s a method of moving data from various sources into a data warehouse. It is one of the crucial elements of business intelligence. An ETL developer is an IT specialist who designs data storage systems. What are the ETL developer roles and responsibilities? What does an ETL developer exactly do? In this article, we focus on the ETL developer job description and see how to become one.

But first, let’s talk about ETL itself. It’s a data-related, three-stage process. In general, it is about transferring data from a source to a target database. During this process, ETL developers first EXTRACT data from different RDBMS source systems (Relational Database Management System–a software system used to maintain a digital database based on a relational model). Then they TRANSFORM that data and finally LOAD it into a given data warehouse system. How exactly does it happen? We have to take a closer look at this process. For more info ETL Testing Training

E-EXTRACT

Data is being extracted from the source system into the staging area. These source systems can be variegated–text files, SQL servers, ERP, spreadsheets, or data from vendors. The staging area allows validating extracted data before it moves into the warehouse*.

T-TRANSFORM

The previously extracted data needs to be cleansed, mapped, and transformed. All this happens in the second stage. Many validations happen during this stage, and these are filtering, cleaning, standardization, data flow validation, data threshold validation, transposing rows and columns, and many more.

L-LOAD

In the last stage, data is loaded into the target warehouse database. That’s challenging because a massive volume of data needs to be loaded in a relatively short period. Recover mechanisms and load verifications are applied before the entire process starts, to ensure that everything happens smoothly.
As you can see, it’s far more complicated than just copying-and-pasting, and the whole process needs to be continuously supervised and secured. And this is how we get to the part where the ETL developer comes in.

ETL developer working, computer, man, woman, office

What does an ETL developer do–job description

An ETL Developer is an IT specialist who designs data storage systems, works to fill them with data and supervises a process of loading big data into a data warehousing software. What’s more, it’s ETL developer who’s responsible for testing its performance and troubleshooting it before it goes live. They usually work as a part of the business intelligence team. This job is complementary with such professions as business intelligence analysts, big data analysts, data scientists, and others.

A typical ETL developer job advertisement includes such roles and responsibilities as

  • Determines data storage needs.
  • Uses different data warehousing concepts to build a data warehouse for internal departments of the organization.
  • Creates and enhances data solutions enabling seamless delivery of data and is responsible for collecting, parsing, managing and analyzing large sets of data.
  • Leads the design of the logical data model and implements the physical database structure and constructs and implements operational data stores and data marts.
  • Designs develop, automates, and support complex applications to extract, transform, and load data.
  • Ensures data quality.
  • Develops logical and physical data flow models for ETL applications.
  • Translates data access, transformation, and movement requirements into functional requirements and mapping designs.

As you can see, their work is strictly related to coding and data management. That’s why this profession requires many analytical skills.

ETL Developer skills and qualifications

To become an ETL developer, you have to display many analytical skills and personal qualifications. As JobHero.com** shows, employers are looking for candidates with these core skills.

ETL Developer skills and qualifications

SOFTWARE KNOWLEDGE

  • PL/SQL Server development experience
  • NoSQL databases experience
  • Dimensional modeling experience
  • Hadoop Components experience, especially HDFS, Spark, Hbase, Hive, Sqoop
  • OLAP, SSAS and MDX experience
  • Java and/or .NET experience
  • ETL tools experience, such as SSIS
  • Modeling tools experience, such as Toad Data Modeller, Erwin, and Embarcadero

An ETL developer should have at least two years of experience in coding in at least one programming language. It is also mandatory to have experience in using ETL tools and even in information relocation and data amalgamation. Personal qualifications and education are also vital. They are as below. Learn more skills from ETL Testing Certification

EDUCATION

The ETL developers usually have a bachelor’s degree, typically in computer science, software engineering, or a related field. All developers also need skills related to the industry in which they are going to work. For instance, those working in a bank should have knowledge of finance so that they can understand a bank’s computing needs and construct data warehousing solutions that match those needs.

Additional BI/ETL training and certifications are a huge asset to the potential employer. For instance, you can try to get a Microsoft Certified Professional certificate in MCSA: SQL 2016 BI Development. You can also obtain Informatica certification. Informatica is one of the leading big data environments, and knowledge of this software will be noticeably beneficial to your potential employer.

PERSONAL QUALIFICATIONS

  • Experience interfacing with business users and understanding their requirements
  • Ability to learn and implement new and different techniques
  • Project Management skills
  • Strong teamwork skills
  • Strong analytical and problem-solving skills

As an ETL developer, you have to be ready to work with and learn many new solutions and technical environments. If you are a constant learner with strong coding and analytical background, this is, probably, a job for you. A good set of communication skills will also be helpful. To become a developer, you have to be a detail-oriented person. Developers often work on many parts of an application or system at the same time and have to, therefore, be able to concentrate and pay attention to detail.

Where can you work as an ETL developer?

The short answer? In every company that works with big data. ETL is an inseparable part of big data management and business intelligence. ETL developers are sometimes employed by a single company, or they may work as an independent consultant to multiple organizations. You can look for employment in AI/BI consulting companies, such as Addepto. We are always keen to get acquainted with the prospective candidates willing to work in a BI environment.

When we are writing this article, there are around 600 jobs in the USA listed on Indeed.com for the “ETL developer” phrase. These job ads derive mostly from the big IT/consulting companies, such as Avani Technology Solutions, CGI Group, Wells Fargo, Capgemini or JP Morgan Chase. Almost 80% of these ads are for full-time work; around 18% is for the contract. Single job openings are part-time, temporary and internships.

Where can you work as an ETL developer?

How much does ETL developer earn?

According to Salary.com***, on average, an ETL Developer salary in the United States is $73,747 as of October 30, 2019. The salary range typically falls between $62,265 and $94,127. Hourly rate range is between $30 and $45. This statement is coherent with Indeed.com, where most job ads estimate salary for $85,000+. If you start as a junior ETL developer, your salary will be a bit lower, around $67,700. Freelancermap**** indicates that top ETL developers can earn up to $127,000.

How to become an ETL developer?

How to become an ETL developer if you have no previous experience? It will be challenging, and, if you have no coding experience, probably impossible even. Many developers started as computer programmers, and then, they were given more responsibility as they gained experience. Eventually, they become ETL developers. So, if you had nothing to do with coding in the past, you should begin with learning to program.

However, you have several options to become an ETL developer. The first option is, to begin with, the internships. Send your resume to AI/BI consulting companies. There still is a shortage of talented candidates. Many AI companies are willing to teach the profession. Don’t wait for the job ad to be placed on a website. Send your applications proactively, and who knows? Maybe your resume will attract the recruiter’s attention. Of course, you have to display your previous coding experience and a will to work as an ETL developer.

The second option is to invest in your knowledge. Try taking part in some of the ETL courses and trainings. For instance, you can find many practical ETL courses on Udemy.com for very reasonable money. They will broaden your knowledge and make you well prepared for future employment. You could also work on your coding and data management experience. This is also essential to work as an ETL developer. Try to start with a similar position, just get to work with data, and then specialize in the ETL sector.

To get in-depth knowledge, enroll for a live free demo on ETL Testing Online Training

Database Connector – Get Started – Mule 4

Anypoint Connector for Database (Database Connector) establishes communication between your Mule app and a relational database.

Database Connector can connect to almost any Java Database Connectivity (JDBC) relational database and run SQL operations. You can specify Dataweave expressions in connector fields and configure attributes dynamically, depending on the database configuration you use. An application can support multi-tenant scenarios using the same configuration element, changing the connection attributes based on, for example, information coming from each request.

You can perform predefined queries, dynamically constructed queries, and template queries that are self-sufficient and customizable. You can perform multiple SQL requests in a single bulk update and make Data Definition Language (DDL) requests that alter the data structure rather than the data itself.

About Connectors

Anypoint connectors are Mule runtime engine extensions that enable you to connect to APIs and resources on external systems, such as Salesforce, Database, ServiceNow, and Twitter.

Prerequisites

Before creating an app, you must have access to the database target resource and Anypoint Platform. You must also understand how to create a Mule app using Flow Designer or Anypoint Studio. For more info Mulesoft Training

Supported Database Types

The Database Connector has connection providers that automatically set the driver class name and create JDBC URLs with the given parameters for the following databases:

  • MySQL
  • Oracle
  • Microsoft SQL Server

You can set up other JDBC databases using a generic JDBC configuration. You can also reference a JDBC DataSource object or a XADataSource object, which is required for XA transactions. You typically create the object in Studio using Spring.

Database Listeners and Operations

The Database connector provides a listener to read from a database in the data source section of a flow. You can execute other operations to read and write to a database anywhere in the Process section. For example, instead of writing single records to a database, bulk operations allow you to modify a collection of records by supplying the SQL to modify each record in the collection.

Other operations allow you to carry out Data Definition Language (DDL) operations, execute stored procedures, or execute entire SQL scripts at once.

Querying a MySQL Database

Illustrates how to use the database connector to connect to a MySQL database. After reading this document and creating and running the example in Mule, you should be able to leverage what you have learned to create an application that connects to a MySQL database.

6596a140-QueryingMySQLDatabase.png

Prerequisites

This document assumes that you are familiar with databases, SQL, HTTP, Mule, Anypoint connectors, Anypoint Studio, elements in a Mule flow, and global elements.

Example Use Case

In the Mule application, an inbound HTTP connector listens for HTTP GET requests in the form: of http://:8081/?lastname=. The HTTP connector passes the value of as one of the message properties to a database connector. The database connector is configured to extract this value and use it in this SQL query:

select first_name from employees where last_name = :lastName

The parameterized query uses the reference to the value of the parameter passed to the HTTP connector. If the HTTP connector receives http://localhost:8081/?lastname=Smith, the SQL query selects the firstname from employees where lastname = Smith.

The database connector instructs the database server to run the SQL query, retrieves the result of the query, and passes it to the Transform message processor which converts the result to JSON. Because the HTTP connector is configured as request-response, the result is returned to the originating HTTP client. Learn more from Mule Training

Set Up and Run the Example

  1. Download and set up the MySQL driver in its default location. You can even check out some of the YouTube videos for assistance with this step.
  2. Start the MySQL server from System Preferences.
  3. Creating the MySQL Database: View the script in the next section of this topic. Navigate to the MySQL driver in a command terminal and paste the script to create a MySQL database called Company that has tables for employees and roles. The script also creates a password protected user and grants it access to the database. username: generatedata; password:generatedata
  4. Open the example project in Anypoint Studio from Anypoint Exchange.
  5. In your application in Studio, click the Global Elements tab. Double-click the HTTP Listener global element to open its Global Element Properties panel. Change the contents of the Port field to the required HTTP port for example, 8081.
  6. Open querying-a-mysql-database.xml file located in src/main/mule directory. Open Database Configuration in Global Elements tab and configure the connection attributes: Host: localhostPort: 3306User: generatedataPassword: generatedataDatabase: company
  7. Configuring the Database Connector for this Example:In this example, the database connector retrieves data from a MySQL database listening on port 3306, the default for MySQL. Ensure that MySQLConfiguration points to the local JDBC MySQL server on your machine.
  8. Run the example application in Anypoint Studio or Standalone
  9. Got to your web browser and type in the following request: http://localhost:8081/?lastname=Puckett You should get the following JSON response: [{“firstname”:”Chava”},{“firstname”:”Quentin”}]

Running the Script on a MySQL Server

Save the MySQL script that follows in the next section to a location on your hard drive.

  1. Open a terminal and run the following command: mysql -u root -D mysql -p
    You are prompted for the MySQL root user’s password. After you type the password, you should see a MySQL prompt: mysql>
  2. Run the MySQL script with the following command, where is the full path and filename to the script, such as /home/joe/create.sample.db.sql. source ; MySQL creates the user, database and tables specified on the script.
  3. To verify the tables, run: use company;show tables;
    The show tables command produces output similar to the following:
    +——————-+ | Tables_in_company | +——————-+ | employees | | roles | +——————-+ 2 rows in set (0.00 sec)
  4. For information about a table, run describe . To see the full contents of a table, run the standard SQL statement select * from .

To exit MySQL, type quit;

To get in-depth knowledge, enroll for a live free demo on Mulesoft Online Training

Salesforce’s Mulesoft rolls out no-code data integration tools

Mulesoft on Monday announced new new tools and pre-packaged connectors designed to make it easier to integrate data from disparate sources, without writing any code. Powered by Salesforce’s Einstein AI, the new tools will enable more people within an organization to “unleash the full power of Salesforce Customer 360,” Salesforce said in a release.

MuleSoft + Salesforce: Accelerating our mission | MuleSoft Blog

Salesforce launched Customer 360, its customer data platform, earlier this year. Though relatively new, the customer data platform (CDP) market is a crowded, competitive space. Salesforce, Adobe, Oracle and several smaller software vendors are all offering CDPs for brands that are anxious to consolidate their customer data into one place where it can be easily leveraged. According to the Connectivity Benchmark Report cited by Salesforce, enterprises have on average 900 applications, but only 29 percent are integrated together. For more info Mulesoft Training

Salesforce acquired Mulesoft for $6.5 billion in 2018 to help customers connect all of their data, whether it resides in the cloud or on premise. MuleSoft’s platform is used to connect software via application programming interfaces (APIs).

“By understanding the power of APIs and integration, anyone can accelerate digital transformation from wherever they sit within their company,” Mulesoft CEO Simon Parmett said in a statement. 

The first new tool on the Mulesoft Anypoint Platform is Flow Designer, which uses Einstein AI to let users create integrations and automate business processes without writing any code. Einstein offers data-mapping recommendations to non-IT users. The tool removes the complex process of managing servers, logs and infrastructure. At the same time, IT teams can still monitor, govern and secure APIs via the Anypoint platform. 

Mulesoft is also introducing pre-built integration templates called Accelerators. The MuleSoft Accelerator for Service Cloud will give service agents templates to connect ServiceNow and Jira with the Salesforce Service Cloud and create tickets directly from Service Cloud. The MuleSoft Accelerator for Commerce Cloud integrates inventory and catalog data directly into the Salesforce Commerce Cloud.

Mulesoft is also updated the Anypoint API Community Manager, adding the ability to browse APIs, content articles, cases, forum posts and client applications through keywords and categories with API Catalog and Integrated Search.

Meanwhile, users can share integrations and APIs across an organization via the Anypoint Exchange. 

In addition to introducing new tools, Mulesoft is leveraging Trailhead, Salesforce’s online learning platform, to equip more workers with integration skills. It’s specifically offering resources related to API basics, APIcreation, API ROI and API ecosystems. Mulesoft says it will “skill up” 100,000 workers over the next five years.

To get in-depth knowledge, enroll for a live free demo on Mulesoft online Training

Ansible + ServiceNow Part 3: Making outbound RESTful API calls to Red Hat Ansible Tower

blog_ansible-and-service-now-3

Red Hat Ansible Tower offers value by allowing automation to scale in a checked manner – users can run playbooks for only the processes and targets they need access to, and no further. 

Not only does Ansible Tower provide automation at scale, but it also integrates with several external platforms. In many cases, this means that users can use the interface they are accustomed to while launching Ansible Tower templates in the background. 

One of the most ubiquitous self service platforms in use today is ServiceNow, and many of the enterprise conversations had with Ansible Tower customers focus on ServiceNow integration. With this in mind, this blog entry walks through the steps to set up your ServiceNow instance to make outbound RESTful API calls into Ansible Tower, using OAuth2 authentication. 

The following software versions are used:

  • Ansible Tower: 3.4, 3.5
  • ServiceNow: London, Madrid

If you sign up for a ServiceNow Developer account, ServiceNow offers a free instance that can be used for replicating and testing this functionality. Your ServiceNow instance needs to be able to reach your Ansible Tower instance. Additionally, you can visit https://ansible.com/license to obtain a trial license for Ansible Tower.

Preparing Ansible Tower

1) In Ansible Tower, navigate to Applications on the left side of the screen. Click the green plus button on the right, which will present you with a Create Application dialog screen. Fill in the following fields:

  • Name: Descriptive name of the application that will contact Ansible Tower
  • Organization: The organization you wish this application to be a part of
  • Authorization Grant Type: Authorization code
  • Redirect URIS: https://<snow_instance_id&gt;.service-now.com/oauth_redirect.do
  • Client Type: Confidential For more info Servicenow Training
image3-4

2) Click the green Save button on the right, at which point a window will pop up, presenting you with the Client ID and Client Secret needed for ServiceNow to make API calls into Ansible Tower. This will only be presented ONCE, so capture these values for later use.

image18

3) Next, navigate to Settings->System on the left side of the screen. You’ll want to toggle the Allow External Users to Create Oauth2 Tokens option to on. Click the green Save button to commit the change.

image4-4

Preparing ServiceNow

4) Moving over to ServiceNow, Navigate to System Definition->Certificates. This will take you to a screen of all the certificates Service Now uses. Click on the blue New button, and fill in these details:

  • Name: Descriptive name of the certificate
  • Format: PEM
  • Type: Trust Store Cert
  • PEM Certificate: The certificate to authenticate against Ansible Tower with. You can use the built-in certificate on your Tower server, located at /etc/tower/tower.cert. Copy the contents of this file into the field in ServiceNow.

Click the Submit button at the bottom.

image9-1

5) In ServiceNow, Navigate to System OAuth->Application Registry. This will take you to a screen of all the Applications ServiceNow communicates with. Click on the blue New button, and you will be asked What kind of Oauth application you want to set up. Select Connect to a third party Oauth Provider.

image20

6) On the new application screen, fill in these details:

Click the Submit button at the bottom.

image19

7) You should be taken out to the list of all Application Registries. Click back into the Application you just created. At the bottom, there should be two tabs: Click on the tab Oauth Entity Scopes. Under here, there is a section called Insert a new row…. Double click here, and fill in the field to say Writing Scope. Click on the green check mark to confirm this change. Then, right-click inside the grey area at the top where it says Application Registries and click Save in the menu that pops up.

image11-1

8) The writing scope should now be Clickable. Click on it, and in the dialog window that you are taken to, type write in the Oauth scope box. Click the Update button at the bottom.

image7-1

9) Back in the Application Settings page, scroll back to the bottom and click the Oauth Entity Profiles tab. There should be an entity profile populated – click into it.

image21

10) You will be taken to the Oauth Entity Profile Window. At the bottom, Type Writing Scope into the Oauth Entity Scope field. Click the green check mark and update.

image23

11) Navigate to System Web Services-> REST Messages. Click the blue New button. In the resulting dialog window, fill in the following fields:

  • Name: Descriptive REST Message Name
  • Endpoint: The url endpoint of the Ansible Tower action you wish to do. This can be taken from the browsable API at https://<tower_url>/api
  • Authentication Type: Oauth 2.0
  • Oauth Profile: Select the Oauth profile you created


Right-click inside the grey area at the top; click Save.

image10-1

12) Click the Get Oauth Token button on the REST Message screen. This will generate a pop-up window asking to authorize ServiceNow against your Ansible Tower instance/cluster. Click Authorize. ServiceNow will now have an OAuth2 token to authenticate against your Ansible Tower server.

image22

13) Under the HTTP Methods section at the bottom, click the blue New button. At the new dialog window that appears, fill in the following fields:

  • HTTP Method: POST
  • Name: Descriptive HTTP Method Name
  • Endpoint: The url endpoint of the Ansible Tower action you wish to do. This can be taken from the browsable API at https://<tower_url>/api
  • HTTP Headers (under the HTTP Request tab)
    • The only HTTP Header that should be required is Content-Type: application/json


You can kick off a RESTful call to Ansible Tower using these parameters with the Test link.

image6-3

Testing connectivity between ServiceNow and Ansible Tower

14) Clicking the Test link will take you to a results screen, which should indicate that the Restful call was sent successfully to Ansible Tower. In this example, ServiceNow kicks off an Ansible Tower job Template, and the response includes the Job ID in Ansible Tower: 276.

image (8)

You can confirm that this Job Template was in fact started by going back to Ansible Tower and clicking the Jobs section on the left side of the screen; a Job with the same ID should be in the list (and, depending on the playbook size, may still be in process):

image15

Creating a ServiceNow Catalog Item to Launch an Ansible Tower Job Template

15) Now that you are able to make outbound RESTful calls from ServiceNow to Ansible Tower, it’s time to create a catalog item for users to select in ServiceNow in a production self-service fashion. While in the HTTP Method options, click the Preview Script Usage link:

image (9)

Copy the resulting script the appears, and paste it into a text editor to reference later.

16) In ServiceNow, navigate to Workflow->Workflow Editor. This will open a new tab with a list of all existing ServiceNow workflows. Click on the blue New Workflow button:

image16

17) In the New Workflow dialog box that appears, fill in the following options:

  • Name: A descriptive name of the workflow
  • Table: Requested Item [sc_req_item]

Everything else can be left alone. Click the Submit button.

image1-10

18) The resulting Workflow Editor will have only a Begin and End box. Click on the line (it will turn blue to indicate it has been selected), then press delete to get rid of it.

image14-1

19) On the right side of the Workflow Editor Screen, select the Core tab and, under Core Activities->Utilities, drag the Run Script option into the Workflow Editor. In the new dialog box that appears, type in a descriptive name, and paste in the script you captured from before. Click Submit to save the Script.

image12-1

20) Draw a connection from Begin, to the newly created Run Script Box, and another from the Run Script box to End. Afterward, click on the three horizontal lines to the left of the Workflow name, and select the Publish option. You are now ready to associate this workflow with a catalog item.image8-1

21) Navigate to Service Catalog->Catalog Definitions->Maintain Items. Click the blue New button on the resulting item list. In the resulting dialog box, fill in the following fields:

  • Name: Descriptive name of the Catalog Item
  • Catalog: The catalog that this item should be a part of
  • Category: Required if you wish users to be able to search for this item

In the Process Engine tab, populate the Workflow field with the Workflow you just created. Click the Submit Button. You’ve not created a new catalog item!

image5-4

22) Lastly, to run this catalog item, navigate to Self-Service->Homepage and search for the catalog item you just created. Once found, click the order now button. You can see the results page pop up in ServiceNow, and you can confirm that the Job is being run in Ansible Tower.

Congratulations! After completing these steps, you can now use a ServiceNow Catalog Item to launch Job and Workflow Templates in Ansible Tower. This is ideal for allowing end users to use a front end they are familiar with in order to perform automated tasks of varying complexities. This familiarity goes a long way toward reducing the time to value for the enterprise as a whole, rather than just the teams responsible for writing the playbooks being used.

To get in-depth knowledge, enroll for a live free demo on Servicenow Online Training

Design a site like this with WordPress.com
Get started