In this salesforce connector, it is configured to create single as an operation from contact as the object type and the field mapping will read from payload meaning, it will get it data from datamapper, the data that datamapper stored from magento when it was queried, the results from datamapper will be added to the database of salesforce.
To trigger the flow in this application, use a Web browser or an HTTP client such as the curl command-line utility to hit the HTTP Inbound Endpoint on localhost port 8081.
I used POSTMAN call my endpoint. ( localhost:8081/sync) After that we logged into Salesforce and verify whether the contacts have been created, all the 30 contacts that we have in Magento have been added to Salesforce contacts making it larger.
Example Use Case Code
Paste this XML code into Anypoint Studio to experiment with the two flows described in the previous section. For more additional info Mule Training
The purpose of this flow is to create customer from salesforce while creating account in salesforce with the details provided.
I. Main Flow
A flow with an HTTP Listener Connector is created, set its Path to requests and the Allowed Methods field to GET. Learn more skills from Mulesoft Training
Create a Global Element for the Connector, set the Host to localhost, leave the Port as the default 8081 and set the Base Path to synCustomer.
After the HTTP Connector, add a Salesforce Connector, DataMapper, Magento, and a Logger.
Salesforce connector
Connects with Salesforce, and performs an operation to extract data.
After you have defined your query, click OK. The Query Editor saves, then displays your query in the Query Text field in the Properties Editor.
Java is a high-level programming language and is platform independent. Java is a collection of objects. It was developed by Sun Microsystems. There are a lot of applications, websites and Games that are developed using Java.
What are the features in JAVA?
Features of Java:
Oops concepts
Object-oriented
Inheritance
Encapsulation
Polymorphism
Abstraction
Platform independent: A single program works on different platforms without any modification.
High Performance: JIT (Just In Time compiler) enables high performance in Java. JIT converts the bytecode into machine language and then JVM starts the execution.
Multi-threaded: A flow of execution is known as a Thread. JVM creates a thread which is called main thread. The user can create multiple threads by extending the thread class or by implementing Runnable interface. For more info Java Online Course
What do you mean by Constructor?
The points given below explain what a Constructor is in detail:
When a new object is created in a program a constructor gets invoked corresponding to the class.
The constructor is a method which has the same name as class name.
If a user doesn’t create a constructor implicitly a default constructor will be created.
The constructor can be overloaded.
If the user created a constructor with a parameter then he should create another constructor explicitly without a parameter.
List the features of Java Programming language.
There are the following features in Java Programming Language.
Simple: Java is easy to learn. The syntax of Java is based on C++ which makes easier to write the program in it.
Object-Oriented: Java follows the object-oriented paradigm which allows us to maintain our code as the combination of different type of objects that incorporates both data and behavior.
Portable: Java supports read-once-write-anywhere approach. We can execute the Java program on every machine. Java program (.java) is converted to bytecode (.class) which can be easily run on every machine.
Platform Independent: Java is a platform independent programming language. It is different from other programming languages like C and C++ which needs a platform to be executed. Java comes with its platform on which its code is executed. Java doesn’t depend upon the operating system to be executed.
Secured: Java is secured because it doesn’t use explicit pointers. Java also provides the concept of ByteCode and Exception handling which makes it more secured.
Robust: Java is a strong programming language as it uses strong memory management. The concepts like Automatic garbage collection, Exception handling, etc. make it more robust.
Architecture Neutral: Java is architectural neutral as it is not dependent on the architecture. In C, the size of data types may vary according to the architecture (32 bit or 64 bit) which doesn’t exist in Java.
Interpreted: Java uses the Just-in-time (JIT) interpreter along with the compiler for the program execution.
High Performance: Java is faster than other traditional interpreted programming languages because Java bytecode is “close” to native code. It is still a little bit slower than a compiled language (e.g., C++).
Multithreaded: We can write Java programs that deal with many tasks at once by defining multiple threads. The main advantage of multi-threading is that it doesn’t occupy memory for each thread. It shares a common memory area. Threads are important for multi-media, Web applications, etc.
Distributed: Java is distributed because it facilitates users to create distributed applications in Java. RMI and EJB are used for creating distributed applications. This feature of Java makes us able to access files by calling the methods from any machine on the internet.
Dynamic: Java is a dynamic language. It supports dynamic loading of classes. It means classes are loaded on demand. It also supports functions from its native languages, i.e., C and C++.
What is the difference between JDK, JRE, and JVM?
JVM
JVM is an acronym for Java Virtual Machine; it is an abstract machine which provides the runtime environment in which Java bytecode can be executed. It is a specification which specifies the working of Java Virtual Machine. Its implementation has been provided by Oracle and other companies. Its implementation is known as JRE.
JVMs are available for many hardware and software platforms (so JVM is platform dependent). It is a runtime instance which is created when we run the Java class. There are three notions of the JVM: specification, implementation, and instance.
JRE
JRE stands for Java Runtime Environment. It is the implementation of JVM. The Java Runtime Environment is a set of software tools which are used for developing Java applications. It is used to provide the runtime environment. It is the implementation of JVM. It physically exists. It contains a set of libraries + other files that JVM uses at runtime. Learn more skills from Java online Training
JDK
JDK is an acronym for Java Development Kit. It is a software development environment which is used to develop Java applications and applets. It physically exists. It contains JRE + development tools. JDK is an implementation of any one of the below given Java Platforms released by Oracle Corporation:
Standard Edition Java Platform
Enterprise Edition Java Platform
Micro Edition Java Platform
How many types of memory areas are allocated by JVM?
Many types:
Class(Method) Area: Class Area stores per-class structures such as the runtime constant pool, field, method data, and the code for methods.
Heap: It is the runtime data area in which the memory is allocated to the objects
Stack: Java Stack stores frames. It holds local variables and partial results, and plays a part in method invocation and return. Each thread has a private JVM stack, created at the same time as the thread. A new frame is created each time a method is invoked. A frame is destroyed when its method invocation completes.
Program Counter Register: PC (program counter) register contains the address of the Java virtual machine instruction currently being executed.
Native Method Stack: It contains all the native methods used in the application.
What is JIT compiler?
Just-In-Time(JIT) compiler: It is used to improve the performance. JIT compiles parts of the bytecode that have similar functionality at the same time, and hence reduces the amount of time needed for compilation. Here the term “compiler” refers to a translator from the instruction set of a Java virtual machine (JVM) to the instruction set of a specific CPU.
Explain the JVM architecture?
Java Virtual Machine contains key components which are classloader, memory area, execution engine etc.
a) Classloader
It is a subsystem of JVM which load class files. Whenever a Java program is run, it is loaded by the classloader.
b) Class Area
Class Area holds class level data of each class file such as metadata, constant run pool, and static variables.
c) Heap
It is the runtime data which is used for allocating objects.
d) Stack
The stack is used for storing temporary variable. This component has a stack frame which is allocated one frame to each thread and when the execution of the thread is completed then that frame is also gets destroyed.
e) Registers
This component contains the address of JVM instruction which currently being executed.
f) Native Method Stack
All the native method stack used in the application are stored in this.
g) Execution Engine
It contains:
A virtual processor
An interpreter that executes the instructions after reading the bytecode.
JIT compiler, used for improving the performance due to the slow execution. It compiles the similar part of the bytecode at the same time which reduces the total time needed for compilation.
h) Java Native Interface
It provides an interface which is needed for communicating with another application developed in another language like C, C++, C# etc.
Answer: In Java, we can define a class inside a class and they are called nested classes. Any nested class which is non-static are known as inner class. Inner classes are associated with objects of the class and they can access all the variables and methods of the outer class.
Any local inner class without any name is known as an anonymous inner class. It is defined and instantiated in a single statement. Anonymous inner class always extend a class or implement an interface. Since an anonymous inner class doesn’t have any name, it is not possible to create its constructor.
What is break and continue statement?
Answer: In a while or do-while loop, we use break for a statement to terminate the loop. We use a break statement in a switch statement to exit the switch case. We can also use break statement for terminating the nested loop.
The continue statement is used for skipping the current iteration of a for, while or do-while loop. We can use the break statement with a label to skip the current iteration of the outermost loop.
The most basic programming question, not only related to the Java. If you have some knowledge of programming languages, you should know the answer to this question as it is among frequently asked Java interview questions for freshers.
What is data encapsulation and what’s its significance?
Encapsulation is a concept in Object Oriented Programming for combining properties and methods in a single unit.
Encapsulation helps programmers to follow a modular approach for software development as each object has its own set of methods and variables and serves its functions independent of other objects. Encapsulation also serves data hiding purpose.
What is a singleton class? Give a practical example of its usage.
A singleton class in java can have only one instance and hence all its methods and variables belong to just one instance. Singleton class concept is useful for the situations when there is a need to limit the number of objects for a class.
The best example of singleton usage scenario is when there is a limit of having only one connection to a database due to some driver limitations or because of any licensing issues.
What are Loops in Java? What are three types of loops?
Looping is used in programming to execute a statement or a block of statement repeatedly. There are three types of loops in Java:
1) For Loops
For loops are used in java to execute statements repeatedly for a given number of times. For loops are used when number of times to execute the statements is known to programmer.
2) While Loops
While loop is used when certain statements need to be executed repeatedly until a condition is fulfilled. In while loops, condition is checked first before execution of statements.
3) Do While Loops
Do While Loop is same as while loop with only difference that condition is checked after execution of block of statements. Hence in case of do while loop, statements are executed at least once.
What is difference between checked and unchecked Exception in Java.
Another java interview question for 2 to 4 years experienced Java programmer from Exception handling. key point to mention here is that checked Exception requires mandatory exception handling code while unchecked doesn’t.
Write Java program to reverse String in Java without using StringBuffer?
Another Java coding interview question asked on 2 ot 4 years experienced Java developer. Many times interviewer specifically mentioned that you can not use StringBuffer because it has reverse() method which makes this taks trivial. So you must know how to do this by using iteration as well as recursion to perform well.
What is difference between path and classpath variables?
PATH is an environment variable used by the operating system to locate the executables. That’s why when we install Java or want any executable to be found by OS, we need to add the directory location in the PATH variable.
Classpath is specific to java and used by java executables to locate class files. We can provide the classpath location while running java application and it can be a directory, ZIP files, JAR files etc.
Can you list down some of important method from object class?
Important methods of object classes are:
hashcode : It returns hash value of the object
equals : It compares the object references
wait : It causes current thread to wait until notify or notifyAll is not called
notify : Wakes up single thread which is waiting for lock
notifyAll: Wakes up all threads which is waiting for lock
toString : Provides String representation of the object
clone : This method is used to clone the object
finalize: This method is called when object is being garbage collected.
Inheritance in Java is a mechanism in which one object acquires all the properties and behaviors of a parent object. It is an important part of OOPs (Object Oriented programming system).
The idea behind inheritance in Java is that you can create new classes that are built upon existing classes. When you inherit from an existing class, you can reuse methods and fields of the parent class. Moreover, you can add new methods and fields in your current class also.
Inheritance represents the IS-A relationship which is also known as a parent-child relationship. For more additional info Java Online Course
Important terminology:
Super Class: The class whose features are inherited is known as superclass(or a base class or a parent class).
Sub Class: The class that inherits the other class is known as subclass(or a derived class, extended class, or child class). The subclass can add its own fields and methods in addition to the superclass fields and methods.
Reusability: Inheritance supports the concept of “reusability”, i.e. when we want to create a new class and there is already a class that includes some of the code that we want, we can derive our new class from the existing class. By doing this, we are reusing the fields and methods of the existing class.
Single Inheritance in Java
Single Inheritance is the simple inheritance of all, When a class extends another class(Only one class) then we call it as Single inheritance. The below diagram represents the single inheritance in java where Class B extends only one class Class A. Here Class B will be the Sub class and Class A will be one and only Super class.
Class A
{
   public void methodA()
   {
     System.out.println("Base class method");
   }
}

Class B extends A
{
   public void methodB()
   {
     System.out.println("Child class method");
   }
   public static void main(String args[])
   {
     B obj = new B();
     obj.methodA();
     obj.methodB();
      }
}
Multi-level Inheritance:
In the case of multi-level inheritance, a subclass that is inheriting one parent class will also act as the base class for another class. Based on the example given below, B is the subclass that is inhering the features of parent class A and acting as the base class for C subclass. Get more additional skills from Java Online Training
public class ClassA
{
    public void dispA()
    {
        System.out.println("disp() method of ClassA");
    }
}
public class ClassB extends ClassA
{
    public void dispB()
    {
        System.out.println("disp() method of ClassB");
    }
}
public class ClassC extends ClassB
{
    public void dispC()
    {
        System.out.println("disp() method of ClassC");
    }
    public static void main(String args[])
    {
        ClassC c = new ClassC();
        c.dispA();
        c.dispB();
        c.dispC();
    }
}
Multiple Inheritance in Java
Multiple Inheritance is nothing but one class extending more than one class. Multiple Inheritance is basically not supported by many Object Oriented Programming languages such as Java, Small Talk, C# etc.. (C++ Supports Multiple Inheritance). As the Child class has to manage the dependency of more than one Parent class. But you can achieve multiple inheritance in Java using Interfaces.
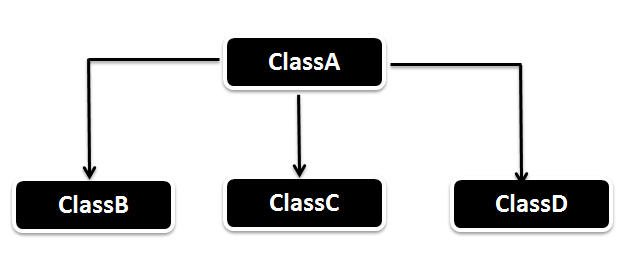
Hierarchical Inheritance in Java
In Hierarchical inheritance, one parent class will be inherited by many sub classes. As per the below example, ClassA will be inherited by ClassB, ClassCandClass-D. ClassA will be acting as a parent class for ClassB, ClassC,andClass-D.
public class ClassA
{
    public void dispA()
    {
        System.out.println("disp() method of ClassA");
    }
}
public class ClassB extends ClassA
{
    public void dispB()
    {
        System.out.println("disp() method of ClassB");
    }
}
public class ClassC extends ClassA
{
    public void dispC()
    {
        System.out.println("disp() method of ClassC");
    }
}
public class ClassD extends ClassA
{
    public void dispD()
    {
        System.out.println("disp() method of ClassD");
    }
}
public class HierarchicalInheritanceTest
{
    public static void main(String args[])
    {
        ClassB b = new ClassB();
        b.dispB();
        b.dispA();
        ClassC c = new ClassC();
        c.dispC();
        c.dispA();
        ClassD d = new ClassD();
        d.dispD();
        d.dispA();
    }
}
This is mix or two or more types of inheritance discussed earlier. Like the multiple inheritances, hybrid inheritance is also not supported in Java through classes but you could make it possible again through interfaces.
Mule has been paired with Spring since its creation in 2004. Both use a streamlined POJO model and XML schema to allow powerful integration. In this tutorial, I am going to show how easy it is to use Spring beans in Mule applications by creating three separate projects.
Simple XML Bean Configuration
In this project, I will try to show how to configure the Spring beans in an XML configuration file.
The Spring Beans
In this project, I have two beans: User.java and UserSRVImpl.java. In UserSRVImpl.java, there is a dependency on the User.java class.
User.java:
package com.anupam.bean;
public class User {
private String firstName;
private String lastName;
private String email;
public String getFirstName() {
return firstName;
}
public void setFirstName(String firstName) {
this.firstName = firstName;
}
public String getLastName() {
return lastName;
}
public void setLastName(String lastName) {
this.lastName = lastName;
}
public String getEmail() {
return email;
}
public void setEmail(String email) {
this.email = email;
}
}
UserSRVImpl.java:
package com.anupam.service;
import com.anupam.bean.User;
public class UserSRVImpl implements UserSRV {
private User user;
@Override
public String sayHello() {
return "Hello from " + user.getFirstName();
}
public User getUser() {
return user;
}
public void setUser(User user) {
this.user = user;
}
}
The Mule Flow
The Mule flow is very simple. It just uses an Invoke component to call the Spring bean’s function. For more additional info Mule Training
The most important part is the configuration of the Spring beans.
In the code snippet above, I am setting the firstName property of the User bean. You can see that the UserSRVImpl is being injected with a dependency of the User bean.
Migrating the Spring Module
Mule 3 allowed to define Spring beans as part of the Mule application using the Spring DSL directly. This approach requires Mule applications to be exposed to the Spring versions and components that the runtime uses internally. This causes two problems:
Users were limited to the Spring version and modules available in the Mule runtime.
Any changes or upgrades in the runtime can potentially affect applications defining. Learn more practical skills from Mulesoft Online Training
The Spring module doesn’t ship with any particular Spring dependency. You can provide whatever ones you need by adding the following to your application’s pom.xml:
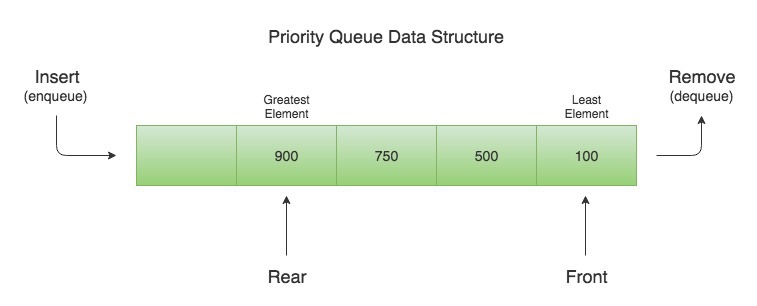
A PriorityQueue is used when the objects are supposed to be processed based on the priority. It is known that a queue follows First-In-First-Out algorithm, but sometimes the elements of the queue are needed to be processed according to the priority, that’s when the PriorityQueue comes into play.
The PriorityQueue is based on the priority heap. The elements of the priority queue are ordered according to the natural ordering, or by a Comparator provided at queue construction time, depending on which constructor is used.
The head of the priority queue is the least element based on the natural ordering or comparator based ordering, if there are multiple objects with same ordering, then it can poll any one of them randomly. When we poll the queue, it returns the head object from the queue. For more additional info Java Online Course
Java Priority Queue size is unbounded but we can specify the initial capacity at the time of its creation. When we add elements to the priority queue, its capacity grows automatically.
PriorityQueue is not thread safe, so java provides PriorityBlockingQueue class that implements the BlockingQueue interface to use in java multithreading environment.
Java Priority Queue implementation provides O(log(n)) time for enqueing and dequeing method.
Java PriorityQueue Methods:
PriorityQueue class has below given important methods, you should know.
boolean add(object) : Inserts the specified element into this priority queue.
boolean offer(object) : Inserts the specified element into this priority queue.
boolean remove(object) : Removes a single instance of the specified element from this queue, if it is present.
Object poll() : Retrieves and removes the head of this queue, or returns null if this queue is empty.
Object element() : Retrieves, but does not remove, the head of this queue, or throws NoSuchElementException if this queue is empty.
Object peek() : Retrieves, but does not remove, the head of this queue, or returns null if this queue is empty.
void clear() : Removes all of the elements from this priority queue.
Comparator comparator() : Returns the comparator used to order the elements in this queue, or null if this queue is sorted according to the natural ordering of its elements. Learn more practical skills from Java Online Training
boolean contains(Object o) : Returns true if this queue contains the specified element.
Iterator iterator() : Returns an iterator over the elements in this queue.
int size() : Returns the number of elements in this queue.
Object[] toArray() : Returns an array containing all of the elements in this queue.
There are seven types of overloaded constructors by which we can set the argument to specify the initial capacity of the queue, supply Comparator to specify custom ordering of elements, or accept everything as default with a no-argument constructor.
PriorityQueue()
PriorityQueue(int initialCapacity)
PriorityQueue(int initialCapacity, Comparator<? Super E> comparator)
When two operators share an operand the operator with the higher precedence goes first. For example, 1 + 2 * 3 is treated as 1 + (2 * 3), whereas 1 * 2 + 3 is treated as (1 * 2) + 3 since multiplication has a higher precedence than addition.
If consecutive operators in an expression have the same precedence, a rule called associativity is used to decide the order in which those operators are evaluated. An operator can be left-associative, right-associative, or non-associative:
Left-associative operators of the same precedence are evaluated in order from left to right. For example, addition and subtraction have the same precedence and they are left-associative. For more additional info Java Online Course
In the expression 10-4+2, the subtraction is done first because it is to the left of the addition, producing a value of 8.
Right-associative operators of the same precedence are evaluated in order from right to left. For example, assignment is right-associative. Consider the following code fragment:
int a = 3;
int b = 4;
a = b = 5;
After the code has been evaluated, both a and b contain 5 because the assignments are evaluated from right to left.
A non-associative operator cannot be combined with other operators of the same precedence.
Precedence and associativity of Java operators.
The table below shows all Java operators from highest to lowest precedence, along with their associativity. Most programmers do not memorize them all, and even those that do still use parentheses for clarity. Learn more skills from Java Certification Course
Order of evaluation of subexpressions.
Associativity and precedence determine in which order Java applies operators to subexpressions but they do not determine in which order the subexpressions are evaluated. In Java, subexpressions are evaluated from left to right (when there is a choice). So, for example in the expression A() + B() * C(D(), E()), the subexpressions are evaluated in the order A(), B(), D(), E(), and C(). Although, C() appears to the left of both D() and E(), we need the results of both D() and E() to evaluate C(). It is considered poor style to write code that relies upon this behavior (and different programming languages may use different rules).
Short circuiting. When using the conditional and and or operators (&& and ||), Java does not evaluate the second operand unless it is necessary to resolve the result. This allows statements like if (s != null && s.length() < 10) to work reliably. Programmers rarely use the non short-circuiting versions (& and |) with boolean expressions.
Larger number means higher precedence.
Precedence
Operator
Type
Associativity
15
() [] ·
Parentheses Array subscript Member selection
Left to Right
14
++ —
Unary post-increment Unary post-decrement
Right to left
13
++ — + – ! ~ ( type )
Unary pre-increment Unary pre-decrement Unary plus Unary minus Unary logical negation Unary bitwise complement Unary type cast
Right to left
12
* / %
Multiplication Division Modulus
Left to right
11
+ –
Addition Subtraction
Left to right
10
<< >> >>>
Bitwise left shift Bitwise right shift with sign extension Bitwise right shift with zero extension
Left to right
9
< <= > >= instanceof
Relational less than Relational less than or equal Relational greater than Relational greater than or equal Type comparison (objects only)
We all know what Continuous Integration (CI) is, right? It is the first step in our journey. In simple words, CI is a software engineering practice where each check-in made by a developer is verified by either of the following:
Pull mechanism: Executing an automated build at a scheduled time
Push mechanism: Executing an automated build when changes are saved in the repository This step is followed by executing a unit test against the latest changes available in the source code repository. Learn more from Java Online Training
Jenkins doesn’t need the introduction; it is an open source and one the most popular CI tools available in the market. It helps in automating the repetitive task of CI. Jenkins makes the process effective and transparent.
The next question you may ask is what makes Jenkins so popular. I already gave you one reason – can you recollect? Yes, because it is open source. Open source tools come with predefined notions, but the Jenkins community is different, and Jenkins as a tool is quite different.
So, what are the other reasons for the popularity of Jenkins?
Let’s have a look:
It is written in Java
It provides extensibility with over 400 plugins for different integrations, such as the following:
Source code management
Build triggers
Build reports
Artifact uploaders
External site/tool integrations
UI plugins
Authentication and user management
Cluster management and distributed build
It supports Java, .NET, Ruby, Groovy, Grails, PHP, Android, and iOS applications
It is easy to use: It has a simple learning curve The user interface was already simple, and it has now improved after Jenkins 2 has been made available to the general public Easy installation Easy configuration.
Installing Jenkins:
Jenkins provides us with multiple ways to install it for all types of users. We can install it on at least the following operating systems:
Ubuntu/Debian
Windows
Mac OS X
OpenBSD
FreeBSD
openSUSE
Gentoo
CentOS/Fedora/Red Hat
One of the easiest options I recommend is to use a WAR file. A WAR file can be used with or without a container or web application server. Having Java is a must before we try to use a WAR file for Jenkins, which can be done as follows:
To get in-depth knowledge enroll for live free demo on Java Online Course
Open command prompt in Windows or a terminal in Linux, go to the directory where the jenkins.war file is stored, and execute the following command: java – jar jenkins.war
Once Jenkins is fully up and running, as shown in the following screenshot, explore it in the web browser by visiting http://localhost:8080.:
By default, Jenkins works on port 8080. Execute the following command from the command-line: java -jar jenkins.war –httpPort=9999
For HTTPS, use the following command: java -jar jenkins.war –httpsPort=8888
Once Jenkins is running, visit the Jenkins home directory. In our case, we have installed Jenkins 2 on a CentOS 6.7 virtual machine.
Go to /home//.jenkins, as shown in the following screenshot. If you can’t see the .jenkins directory, make sure hidden files are visible. In CentOS, press Ctrl + H to make hidden files visible:
The Prepared Statement is a slightly more powerful version of a Statement, and should always be at least as quick and easy to handle as a Statement. The Prepared Statement may be parametrized.
Most relational databases handles a JDBC / SQL query in four steps:
Parse the incoming SQL query
Compile the SQL query
Plan/optimize the data acquisition path
Execute the optimized query / acquire and return data
A Statement will always proceed through the four steps above for each SQL query sent to the database. Learn more skills from Java Online Course
Thus, when creating a Prepared Statement some pre-optimization is performed immediately. The effect is to lessen the load on the database engine at execution time
Sometimes it is more convenient to use a PreparedStatement object for sending SQL statements to the database. This special type of statement is derived from the more general class, Statement that you already know.
If you want to execute a Statement object many times, it usually reduces execution time to use a PreparedStatement object instead.
The main feature of a PreparedStatement object is that, unlike a Statement object, it is given a SQL statement when it is created. The advantage to this is that in most cases, this SQL statement is sent to the DBMS right away, where it is compiled.
As a result, the PreparedStatement object contains not just a SQL statement, but a SQL statement that has been precompiled. This means that when the PreparedStatement is executed, the DBMS can just run the PreparedStatement SQL statement without having to compile it first. For more additional skills Java Online Training
Although PreparedStatement objects can be used for SQL statements with no parameters, you probably use them most often for SQL statements that take parameters.
The advantage of using SQL statements that take parameters is that you can use the same statement and supply it with different values each time you execute it. Examples of this are in the following sections.
Creating a PreparedStatement
Before you can use a PreparedStatement you must first create it. You do so using the Connection.prepareStatement(), like this:
String sql = "select * from people where id=?";
PreparedStatement preparedStatement = connection.prepareStatement(sql);
The PreparedStatement is now ready to have parameters inserted.
Inserting Parameters into a PreparedStatement
Everywhere you need to insert a parameter into your SQL, you write a question mark (?). For instance:
String sql = "select * from people where id=?";
Once a PreparedStatement is created (prepared) for the above SQL statement, you can insert parameters at the location of the question mark. This is done using the many setXXX() methods. Here is an example:
preparedStatement.setLong(1, 123);
The first number (1) is the index of the parameter to insert the value for. The second number (123) is the value to insert into the SQL statement.
Here is the same example with a bit more details:
String sql = "select * from people where id=?";
PreparedStatement preparedStatement = connection.prepareStatement(sql);

preparedStatement.setLong(123);
You can have more than one parameter in an SQL statement. Just insert more than one question mark. Here is a simple example:
String sql = "select * from people where firstname=? and lastname=?";

PreparedStatement preparedStatement = connection.prepareStatement(sql);

preparedStatement.setString(1, "John");
preparedStatement.setString(2, "Smith");
Executing the PreparedStatement
Executing the PreparedStatement looks like executing a regular Statement. To execute a query, call the executeQuery() or executeUpdate method. Here is an executeQuery() example:
String sql = "select * from people where firstname=? and lastname=?";

PreparedStatement preparedStatement = connection.prepareStatement(sql);

preparedStatement.setString(1, "John");
preparedStatement.setString(2, "Smith");

ResultSet result = preparedStatement.executeQuery();
As you can see, the executeQuery() method returns a ResultSet. Iterating the ResultSet is described in the Query the Database text.
Here is an executeUpdate() example:
String sql = "update people set firstname=? , lastname=? where id=?";

PreparedStatement preparedStatement = connection.prepareStatement(sql);

preparedStatement.setString(1, "Gary");
preparedStatement.setString(2, "Larson");
preparedStatement.setLong  (3, 123);

int rowsAffected = preparedStatement.executeUpdate();
The executeUpdate() method is used when updating the database. It returns an int which tells how many records in the database were affected by the update.
Reverse A String In Java – Here, we have discussed the various methods to reverse a string using java. The compiler has been added so that you can execute the programs by yourself, alongside suitable examples and sample outputs. The methods are as follows:
The following program to find reverse a string has been written in Five different ways. If you do have any doubts please do let us know.
Java program to find a reverse a string – Using Static Method
Using Array
Using Recursion
Using While Loop
Using For Loop
Using Word by Word
Some interesting facts about String and StringBuffer classes :
Objects of String are immutable.
String class in Java does not have reverse () method, however StringBuilder class has built in reverse() method.
StringBuilder class do not have toCharArray() method, while String class does have toCharArray() method – For more additional info Java Online Training
Example 1:
package stringreverse;
import java.util.*;
public class Stringreverse {


    public static void main(String[] args) {
        // TODO code application logic here
         String original, reverse = "";
    Scanner in = new Scanner(System.in);

    System.out.println("Enter a string to reverse");
    original = in.nextLine();

    int length = original.length();

    for (int i = length - 1 ; i >= 0 ; i--)
      reverse = reverse + original.charAt(i);

    System.out.println("Reverse of the string: " + reverse);
    }

}
output:
Example 2: Using String Buffer:
package stringbuffer;


public class Stringbuffer {


    public static void main(String[] args) {
        // TODO code application logic here
        StringBuffer a = new StringBuffer("Java string buffer");
     System.out.println(a.reverse());
    }

}
Output:
Example 3:
package whileloop;
import java.util.*;
public class Whileloop {


    public static void main(String[] args) {

        String str;
	Scanner scan=new Scanner(System.in);
	System.out.print("Enter a string : ");
	str=scan.nextLine();
	System.out.println("Reverse of a String '"+str+"' is  :");
	int i=str.length();
	while(i>0)
	{
	System.out.print(str.charAt(i-1));
	i--;
	}
    }

}
Output:
To get in-depth knowledge, enroll for live free demo on Java Online Course
Within an application, you can initiate a batch job scope, which is a block of code that splits messages into individual records, performs actions upon each record, then reports on the results and potentially pushes the processed output to other systems or queues.
For example, you can use batch processing when:
Synchronizing data sets between business applications, such as syncing contacts between NetSuite and Salesforce.
Extracting, transforming and loading (ETL) information into a target system, such as uploading data from a flat file (CSV) to Hadoop.
Handling large quantities of incoming data from an API into a legacy system.
Overview:
Within a Mule application, batch processing provides a construct for asynchronously processing larger-than-memory data sets that are split into individual records.
Batch jobs allow for the description of a reliable process that automatically splits up source data and stores it into persistent queues, which makes it possible to process large data sets while providing reliability. For more info Mulesoft Online Training
In the event that the application is redeployed or Mule crashes, the job execution is able to resume at the point it stopped.
The job is then expressed in terms of processing individual records, providing semantics for record level variables, aggregation, and error handling.
Basic Anatomy
The heart of Mule’s batch processing lies within the batch job. A batch job is a scope that splits large messages into records that Mule processes asynchronously. In the same way flows process messages, batch jobs process records.
The Batch XML structure was modified on Mule 4.0. The example below shows abbreviated details to highlight batch elements.
A batch job contains one or more batch steps that act upon records as they move through the batch job.
Each batch step in a batch job contains processors that act upon a record to transform, route, enrich, or otherwise process data contained within it. By leveraging the functionality of existing Mule processors, the batch step offers a lot of flexibility regarding how a batch job processes records. A batch job executes when the flow reaches the process-records section of the batch job. When triggered, Mule creates a new batch job instance. Get more additional info from Mulesoft training
When the batch job starts executing, Mule splits the incoming message into records, stores them in a persistent queue, and queries and schedules those records in blocks of records to process. By default, the runtime stores 100 records in each batch step.
You can customize this size according to the performance you require. After all the records have passed through all batch steps, the runtime ends the batch job instance and reports the batch job result indicating which records succeeded and which failed during processing.
Error Handling:
Batch jobs can handle any record-level failure that might occur in processing to prevent the failure of a complete batch job. Further, you can set or remove variables on individual records so that during batch processing, Mule can route or otherwise act upon records in a batch job according to a variable (assigned above).
Batch Job vs. Batch Job Instance:
A batch job is the scope element in an application in which Mule processes a message payload as a batch of records. The term batch job is inclusive of all three phases of processing: Load and Dispatch, Process, and On Complete.
A batch job instance is an occurrence in a Mule application whenever a Mule flow executes a batch job. Mule creates the batch job instance in the Load and Dispatch phase. Every batch job instance is identified internally using a unique String known as batch job instance id.
To get in-depth knowledge, enroll for live free demo of Mule Training
This identifier is useful if you want, for example, to pass the local job instance ID to an external system for referencing and managing data, improve the job’s custom logging, or even send an email or SMS notifications for meaningful events around that specific batch job instance.
Batch Job Processing Phases
Each batch job contains three different phases:
Load and Dispatch.
Process.
On Complete.
Load and Dispatch
This first phase is implicit. During this phase, the runtime performs all the “behind the scenes” work to create a batch job instance. Essentially, this is the phase during which Mule turns a serialized message payload into a collection of records for processing as a batch. You don’t need to configure anything for this activity to occur, though it is useful to understand the tasks Mule completes during this phase.
Mule splits the message using Dataweave. This first step creates a new batch job instance. Mule exposes the batch job instance ID through the batchJobInstanceId variable. This variable is available in every step and the on-complete phase.
Mule creates a persistent queue and associates it with the new batch job instance.
For each item generated by the splitter, Mule creates a record and stores it in the queue. This activity is “all or nothing” – Mule either successfully generates and queues a record for every item, or the whole message fails during this phase.
Mule presents the batch job instance, with all its queued-up records, to the first batch step for processing.
After this phase completes, the flow will continue.
The next phase, “Process,” is asynchronous, meaning that the flow will not wait for the batch job to finish processing all records.
Process
During the “Process” phase, the runtime begins processing the records in the batch asynchronously. Each record moves through the processors in the first batch step, then is sent back to the original queue while it waits to be processed by the second batch step and so on until every record has passed through every batch step.
Only one queue exists, and records are picked out of it for each batch step, processed, and then sent back to it; each record keeps track of what stages it has been processed through while it sits on this queue.
Note that a batch job instance does not wait for all its queued records to finish processing in one batch step before pushing any of them to the next batch step. Queues are persistent.
Mule persists a list of all records as they succeed or fail to process through each batch step. If a record should fail to be processed by an event processor in a batch step, the runtime continues processing the batch, skipping over the failed record in each subsequent batch step.
At the end of this phase, the batch job instance completes and, therefore, ceases to exist.
Beyond simple processing of records, there are several things you can do with records within a batch step.
You can apply filters by adding acceptExpressions within each batch step to prevent the step from processing certain records. For example, you can set a filter to prevent a step from processing any records which failed to process in the preceding step.
You can use a batch aggregator processor to aggregate records in groups, sending them as bulk upserts to external sources or services. For example, rather than upserting each contact (that is, a record) in a batch to Google Contacts, you can configure a batch aggregator to accumulate, say, 100 records, then upsert all of them to Google Contacts in one chunk.