Workday Tools for SAP Integration

Workday® Tools for SAP Integration

Integrating cloud platforms with traditional ERP platforms like SAP is difficult, and ERP integration methods like SAP’s Application Link Enabling (ALE) are limited and inflexible. Attempts to improve flexibility have compounded the complexity. For most IT organizations, integrations between systems is a difficult, budget-consuming endeavor. Since large ERP vendors are systems of record, their requirements control the relationships.

Workday® is breaking the logjams by creating packaged integration solutions, flexible tools, and advanced developer platforms.

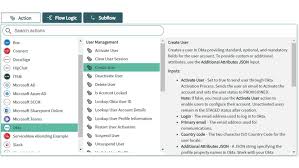
As more SAP users implement Workday® as the system of record for worker information, Workday® has standardized the approaches to SAP integration, among others in its cloud integration platform. For more info Workday Training

Workday® Integration Services

Workday® has unified all the many ways to integrate data flow into a single Enterprise Service Bus (ESB). The platform provides three ways to deploy integrations: packaged services, tools for business users, and tools for integration developers.

Connectors and Toolkits. Where the number of integrations makes it feasible, Workday® creates and maintains packaged services pre-configured for specific external platforms or toolkits for external vendor types. These include payroll vendors, benefits providers, financial systems, procurement, and many others.

Enterprise Interface Builder is a graphical tool for business users and analysts. Users can extract and load data using Excel spreadsheets, and package data sets using standard data formats, protocols, and transports.

Workday® Studio is a full-featured developer tool for creating and maintaining Web Services integrations. It includes a graphical IDE and pre-packaged components. It is customizable with Java, Spring, or third-party interfaces. For more details Workday Course

Workday® Services

Workday® maintains internal services that make data integration easier and more transparent than traditional ETL operations. These are configurable services that handle data extractions without programming.

Business Management Services return data sets from the major functional areas in Workday®. The operations correspond to business events and business objects in Workday®. They return large data sets but can be configured to return subsets.

Reporting Services, known as Reports as a Service (RaaS), are used to define and create custom REST/SOAP APIs. You define the data set and package it for Workday® or any third-party integration tool.

Outbound Messaging Services provide real-time notifications to external applications when business events occur in Workday®. The workflow behind the event is configured to push an outbound message to a subscribing ALE system. The subscribing system can then query Workday® to get details about the event.

Infrastructure Services expose Workday® metadata to external applications to extend the functionality of integrations. External applications can monitor the execution of integration events to see the status and when and how data will come from Workday®. 

SAP/Workday® Integration

Integrations between Workday® and SAP use a combination of Workday® Services, Connectors, and Studio Web Services APIs.

The most common implementation model for SAP customers who use Workday® is to make Workday® the system of record for people information and SAP the financial system of record. Learn more additional skills from Workday Online Course

Maintaining SAP HCM

SAP maintains Human Capital Management information in Organization Management (OM) and Personnel Administration (PA). Once data migrates to Workday® Human Capital Management, OM and PA must still be maintained for payroll processing, financials, and workflow.

Organization, Position, and Job Connectors or Web Services in Workday® update OM in SAP. The Worker Connector or Web Service updates PA. The Workday® Document Transfer and Deliver process transforms the data into the SAP IDoc XML format.

Since the Workday® cloud is XML with an XSD, standard XSLT will transform the data into the data format the SAP IT group specifies. Workday® provides an XSLT library for validations and error-handling.

Cost Center Updates

When cost center information changes in SAP, it is necessary to update Workday® when the event happens. The event triggers an IDoc to a Workday® Organization Connector or Web Service.

Worker Updates

Depending on the data needs of the existing SAP modules, updates to Worker records in Workday® will need to initiate a simple Worker Connector/Web Service or a Worker Full Stack via Web Services to SAP Personnel Administration.

SAP Mini Master

SAP created a small file requirement for maintaining Personnel Administration information for workflow routing in SAP applications. The typical file will have about a dozen fields.

For Mini Master files, the best practice is to use Connectors to generate the data.

  • Integration maps are configurable, reducing the risk of failure by eliminating extra processing nodes and the need for programmatic troubleshooting.
  • Workday® Core Connectors detect data changes on an object or event and deliver only those changes in the final file extract. The integration can be configured to manage the types of changes detected in the transaction log. SAP infotypes can be mapped to Workday® transaction types.

SAP Payroll

If Mini Master is the current method of feeding master data to Payroll, the data feed will need to be expanded to run payroll, depending on what countries payroll may be running. This method may not capture sufficient information where in the cases of proration, retroactivity, and adjustments.

Workday® Cloud Connect for Third-Party Payroll can be a solution. It takes a top-of-stack approach by taking a snapshot of the transaction history and sending a full or changes-only extract file to SAP. 

Workday® Studio will be the option if transactions must be sequenced.

Cloud Connector Workday® Studio will also be the best options for using a payroll processor other than SAP.

Using Workday® Payroll

If you are using Workday® Payroll, you will need to update SAP Financials after each pay run. In that case, a Workday® Custom Report and Enterprise Interface Builder will handle the job without programming. 

To get in-depth knowledge, enroll fora live free demo on Workday Online Training

Configuration Management Database (CMDB)

With the ServiceNow Configuration Management Database (CMDB) application, build logical representations of assets, services, and the relationships between them that comprise the infrastructure of your organization. Details about these components are stored in the CMDB which you can use to monitor the infrastructure, helping ensure integrity, stability, and continuous service operation.

IntegrationHub - Now Platform - ServiceNow

Use core features such as CMDB Health, CMDB Identification and Reconciliation, and CMDB CI Lifecycle Management to monitor and detect health issues, reconcile data integrity issues, and manage data life cycle.

Note: CMDB modules, features, and wizards are not supported on mobile devices. You cannot use a mobile device to access the CI Class Manager, Query Builder, or Duplicate CI Remediator. Or to access or configure CMDB features such as Identification and Reconciliation, CMDB Health, CI Lifecycle Management, baseline CMDB, and proposed changes. Learn more from Servicenow Training

Duplicate CI Remediator

Reconcile duplicate CIs in your system by using a wizard that guides you through the reconciliation process. The wizard pages provide detailed information about the duplicate CIs, letting you choose which attributes, relationships, and related items to retain, and what to reconcile.

Use the CMDB Duplicate Task Utils API to manually create a de-duplication task for duplicate CIs that the system is not configured to detect. You can then remediate those tasks using the Duplicate CI Remediator as you would remediate a system generated de-duplication task.

Get extra guidance through the remediation process from Embedded Help topics which are included with the Duplicate CI Remediator. Get more skills from Servicenow Course

CI Relationships Health Use the ‘Relationships not compliant with all relationship rules’ report to see relationships that do not comply with any relationship governance rules, including suggested relationships and dependent relationship rules.

Application Services Use application services as a unified infrastructure for creating, maintaining, and managing services in the CMDB, Service Mapping, Event Management (if activated), and other ServiceNow applications. You can convert legacy business services to application services.

Changed in this release

CI Class Manager

  • Labels and other elements in the user interface have been changed across the CI Class Manager for better clarity and helpfulness.
  • Suggested relationships displays a diagram of all suggested relationships for the class and lets you add or delete suggested relationships for the class. All suggested relationships provided and used by Discovery, Service Mapping, and patterns, appear in the diagram (however, there is no notation of the source of a suggested relationship).
  • Embedded help provides information and guidance for using the CI Class Manager.

To get in-depth knowledge, enroll for a live free demo on Servicenow Online Training

Connect to ServiceNow Data in Python on Linux/UNIX

The CData ODBC Driver for ServiceNow enables you to create Python applications on Linux/UNIX machines with connectivity to ServiceNow data. Leverage the pyodbc module for ODBC in Python.

The rich ecosystem of Python modules lets you get to work quicker and integrate your systems more effectively. With the CData Linux/UNIX ODBC Driver for ServiceNow and the pyodbc module, you can easily build ServiceNow-connected Python applications. This article shows how to use the pyodbc built-in functions to connect to ServiceNow data, execute queries, and output the results.

Using the CData ODBC Drivers on a UNIX/Linux Machine

The CData ODBC Drivers are supported in various Red Hat-based and Debian-based systems, including Ubuntu, Debian, RHEL, CentOS, and Fedora. There are also several libraries and packages that are required, many of which may be installed by default, depending on your system.

For more information on the supported versions of Linux operating systems and the required libraries, please refer to the “Getting Started” section in the help documentation (installed and found online). For more Servicenow Training

Installing the Driver Manager

Before installing the driver, check that your system has a driver manager. For this article, you will use unixODBC, a free and open source ODBC driver manager that is widely supported.

For Debian-based systems like Ubuntu, you can install unixODBC with the APT package manager:

$ sudo apt-get install unixODBC unixODBC-dev

For systems based on Red Hat Linux, you can install unixODBC with yum or dnf:

$ sudo yum install unixODBC unixODBC-devel

The unixODBC driver manager reads information about drivers from an odbcinst.ini file and about data sources from an odbc.ini file. You can determine the location of the configuration files on your system by entering the following command into a terminal

$ odbcinst -j

The output of the command will display the locations of the configuration files for ODBC data sources and registered ODBC drivers. User data sources can only be accessed by the user account whose home folder the odbc.ini is located in. System data sources can be accessed by all users. Below is an example of the output of this command:

DRIVERS............: /etc/odbcinst.iniSYSTEM DATA SOURCES: /etc/odbc.iniFILE DATA SOURCES..: /etc/ODBCDataSourcesUSER DATA SOURCES..: /home/myuser/.odbc.iniSQLULEN Size.......: 8SQLLEN Size........: 8SQLSETPOSIROW Size.: 8

Installing the Driver

You can download the driver in standard package formats: the Debian .deb package format or the .rpm file format. Once you have downloaded the file, you can install the driver from the terminal. Learn more details from Servicenow Developer Training

The driver installer registers the driver with unixODBC and creates a system DSN, which can be used later in any tools or applications that support ODBC connectivity.

For Debian-based systems like Ubuntu, run the following command with sudo or as root:

$ dpkg -i /path/to/package.deb

For Red Hat systems and other systems that support .rpms, run the following command with sudo or as root:

$ rpm -i /path/to/package.rpm

Once the driver is installed, you can list the registered drivers and defined data sources using the unixODBC driver manager:

List the Registered Driver(s)

$ odbcinst -q -dCData ODBC Driver for ServiceNow...

List the Defined Data Source(s)

view source$ odbcinst -q -sCData ServiceNow Source...

To use the CData ODBC Driver for ServiceNow with unixODBC, ensure that the driver is configured to use UTF-16. To do so, edit the INI file for the driver (cdata.odbc.servicenow.ini), which can be found in the lib folder in the installation location (typically /opt/cdata/cdata-odbc-driver-for-servicenow), as follows:

cdata.odbc.servicenow.ini

[Driver]DriverManagerEncoding = UTF-16

Modifying the DSN

The driver installation predefines a system DSN. You can modify the DSN by editing the system data sources file (/etc/odbc.ini) and defining the required connection properties. Additionally, you can create user-specific DSNs that will not require root access to modify in $HOME/.odbc.ini.

ServiceNow uses the OAuth 2.0 authentication standard. To authenticate using OAuth, you will need to register an OAuth app with ServiceNow to obtain the OAuthClientId and OAuthClientSecret connection properties. In addition to the OAuth values, you will need to specify the Instance, Username, and Password connection properties.

See the “Getting Started” chapter in the help documentation for a guide on connecting to ServiceNow Course

/etc/odbc.ini or $HOME/.odbc.ini

[CData ServiceNow Source]Driver = CData ODBC Driver for ServiceNowDescription = My DescriptionOAuthClientId = MyOAuthClientIdOAuthClientSecret = MyOAuthClientSecretUsername = MyUsernamePassword = MyPasswordInstance = MyInstance

For specific information on using these configuration files, please refer to the help documentation (installed and found online).

You can follow the procedure below to install pyodbc and start accessing ServiceNow through Python objects.

Install pyodbc

You can use the pip utility to install the module:

pip install pyodbc

Be sure to import with the module with the following:

import pyodbc

Connect to ServiceNow Data in Python

You can now connect with an ODBC connection string or a DSN. Below is the syntax for a connection string:view sourcecnxn = pyodbc.connect('DRIVER={CData ODBC Driver for ServiceNow};OAuthClientId=MyOAuthClientId;OAuthClientSecret=MyOAuthClientSecret;Username=MyUsername;Password=MyPassword;Instance=MyInstance;')

Below is the syntax for a DSN:

cnxn = pyodbc.connect('DSN=CData ServiceNow Sys;')

Execute SQL to ServiceNow

Instantiate a Cursor and use the execute method of the Cursor class to execute any SQL statement.

cursor = cnxn.cursor()

Select

You can use fetchallfetchone, and fetchmany to retrieve Rows returned from SELECT statements:view sourceimport pyodbc cursor = cnxn.cursor()cnxn = pyodbc.connect('DSN=CData ServiceNow Source;User=MyUser;Password=MyPassword')cursor.execute("SELECT sys_id, priority FROM incident WHERE category = 'request'")rows = cursor.fetchall()for row in rows:print(row.sys_id, row.priority)

You can provide parameterized queries in a sequence or in the argument list:

cursor.execute("SELECT sys_id, priorityFROM incidentWHERE category = ?", 'request',1)

Metadata Discovery

You can use the getinfo method to retrieve data such as information about the data source and the capabilities of the driver. The getinfo method passes through input to the ODBC SQLGetInfo method.

cnxn.getinfo(pyodbc.SQL_DATA_SOURCE_NAME)

You are now ready to build Python apps in Linux/UNIX environments with connectivity to ServiceNow data, using the CData ODBC Driver for ServiceNow.

To get in-depth knowledge, enroll for a live free demo on Servicenow Online Training

Which Integration Framework Should You Use – Spring Integration, Mule ESB or Apache Camel?

Data exchanges between companies are increasing a lot. The number of applications that must be integrated is increasing, too. The interfaces use different technologies, protocols and data formats. Nevertheless, the integration of these applications must be modeled in a standardized way, realized efficiently and supported by automatic tests.

Microservices vs. ESBs - DZone Integration

Three integration frameworks are available in the JVM environment, which fulfil these requirements: Spring Integration, Mule ESB and Apache Camel. They implement the well-known Enteprise Integration Patterns and therefore offer a standardized, domain-specific language to integrate applications.

These integration frameworks can be used in almost every integration project within the JVM environment – no matter  which technologies, transport protocols or data formats are used. All integration projects can be realized in a consistent way without redundant boilerplate code. learn more from Mulesoft Training

This article compares all three alternatives and discusses their pros and cons. If you want to know, when to use a more powerful Enterprise Service Bus (ESB) instead of one of these lightweight integration frameworks.

Comparison Criteria

Several criteria can be used to compare these three integration frameworks:

  • Open source
  • Basic concepts / architecture
  • Testability
  • Deployment
  • Popularity
  • Commercial support
  • IDE-Support
  • Errorhandling
  • Monitoring
  • Enterprise readiness
  • Domain specific language (DSL)
  • Number of components for interfaces, technologies and protocols
  • Expandability

Similarities

All three frameworks have many similarities. Therefore, many of the above comparison criteria are even! All implement the EIPs and offer a consistent model and messaging architecture to integrate several technologies.

No matter which technologies you have to use, you always do it the same way, i.e. same syntax, same API, same automatic tests. The only difference is the the configuration of each endpoint (e.g. JMS needs a queue name while JDBC needs a database connection url). IMO, this is the most significant feature.

Each framework uses different names, but the idea is the same. For instance, „Camel routes“ are equivalent to „Mule flows“, „Camel components“ are called „adapters“ in Spring Integration. Get more skills from Mulesoft Certification

Besides, several other similarities exists, which differ from heavyweight ESBs. You just have to add some libraries to your classpath. Therefore, you can use each framework everywhere in the JVM environment. No matter if your project is a Java SE standalone application, or if you want to deploy it to a web container (e.g. Tomcat), JEE application server (e.g. Glassfish), OSGi container or even to the cloud. Just add the libraries, do some simple configuration, and you are done. Then you can start implementing your integration stuff (routing, transformation, and so on).

All three frameworks are open source and offer familiar, public features such as source code, forums, mailing lists, issue tracking and voting for new features. Good communities write documentation, blogs and tutorials (IMO Apache Camel has the most noticeable community). Only the number of released books could be better for all three. Commercial support is available via different vendors:

  • Spring Integration
  • Mule ESB
  • Apache Camel

IDE support is very good, even visual designers are available for all three alternatives to model integration problems (and let them generate the code). Each of the frameworks is enterprise ready, because all offer required features such as error handling, automatic testing, transactions, multithreading, scalability and monitoring.

Differences

If you know one of these frameworks, you can learn the others very easily due to their same concepts and many other similarities. Next, let’s discuss their differences to be able to decide when to use which one. The two most important differences are the number of supported technologies and the used DSL(s). Thus, I will concentrate especially on these two criteria in the following. I will use code snippets implementing the well-known EIP „Content-based Router“ in all examples. Judge for yourself, which one you prefer. Learn additional skills from Mulesoft Training and Certification

Spring Integration

Spring Integration is based on the well-known Spring project and extends the programming model with integration support. You can use Spring features such as dependency injection, transactions or security as you do in other Spring projects.

Spring Integration is awesome, if you already have got a Spring project and need to add some integration stuff. It is almost no effort to learn Spring Integration if you know Spring itself. Nevertheless, Spring Integration only offers very rudimenary support for technologies – just „basic stuff“ such as File, FTP, JMS, TCP, HTTP or Web Services. Mule and Apache Camel offer many, many further components!

Integrations are implemented by writing a lot of XML code (without a real DSL), as you can see in the following code snippet:

<file:inbound-channel-adapter

            id=”incomingOrders”

            directory=”file:incomingOrders”/>


<payload-type-router input-channel=”incomingOrders”>

            <mapping type=”com.kw.DvdOrder” channel=”dvdOrders” />

            <mapping type=”com.kw.VideogameOrder”

                                channel=”videogameOrders” />

            <mapping type=”com.kw.OtherOrder” channel=”otherOrders” />

</payload-type-router>


<file:outbound-channel-adapter

               id=”dvdOrders”

               directory=”dvdOrders”/>


<jms:outbound-channel-adapter

               id=”videogamesOrders”

               destination=”videogameOrdersQueue”

               channel=”videogamesOrders”/>


<logging-channel-adapter id=”otherOrders” level=”INFO”/>

You can also use Java code and annotations for some stuff, but in the end, you need a lot of XML. Honestly, I do not like too much XML declaration. It is fine for configuration (such as JMS connection factories), but not for complex integration logic. At least, it should be a DSL with better readability, but more complex Spring Integration examples are really tough to read. Get more details From Mulesoft Course

Besides, the visual designer for Eclipse (called integration graph) is ok, but not as good and intuitive as its competitors. Therefore, I would only use Spring Integration if I already have got an existing Spring project and must just add some integration logic requiring only „basic technologies“ such as File, FTP, JMS or JDBC.

Mule ESB

Mule ESB is – as the name suggests – a full ESB including several additional features instead of just an integration framework (you can compare it to Apache ServiceMix which is an ESB based on Apache Camel). Nevertheless, Mule can be use as lightweight integration framework, too – by just not adding and using any additional features besides the EIP integration stuff. As Spring Integration, Mule only offers a XML DSL. At least, it is much easier to read than Spring Integration, in my opinion. Mule Studio offers a very good and intuitive visual designer. Compare the following code snippet to the Spring integration code from above. It is more like a DSL than Spring Integration. This matters if the integration logic is more complex.

<flow name=”muleFlow”>

        <file:inbound-endpoint path=”incomingOrders”/>

        <choice>

            <when expression=”payload instanceof com.kw.DvdOrder”

                         evaluator=”groovy”>

                        <file:outbound-endpoint path=”incoming/dvdOrders”/>

            </when>

            <when expression=”payload instanceof com.kw.DvdOrder”

                          evaluator=”groovy”>

                          <jms:outbound-endpoint

                          queue=”videogameOrdersQueue”/>

            </when>

            <otherwise>

                                <logger level=”INFO”/>

            </otherwise>

        </choice>

</flow>


Apache Camel

Apache Camel is almost identical to Mule. It offers many, many components (even more than Mule) for almost every technology you could think of. If there is no component available, you can create your own component very easily starting with a Maven archetype! If you are a Spring guy: Camel has awesome Spring integration, too. As the other two, it offers a XML DSL:

<route>

        <from uri=”file:incomingOrders”/>

        <choice>

            <when>

                <simple>${in.header.type} is ‘com.kw.DvdOrder’</simple>

                            <to uri=”file:incoming/dvdOrders”/>

            </when>

            <when>

                <simple>${in.header.type} is ‘com.kw.VideogameOrder’

               </simple>

                            <to uri=”jms:videogameOrdersQueue”/>

            </when>

            <otherwise>

                <to uri=”log:OtherOrders”/>

            </otherwise>

        </choice>

    </route>

Readability is better than Spring Integration and almost identical to Mule. Besides, a very good (but commercial) visual designer called Fuse IDE is available by FuseSource – generating XML DSL code. Nevertheless, it is a lot of XML, no matter if you use a visual designer or just your xml editor. Personally, I do not like this.

To get in-depth knowledge, enroll for a live free demo on Mulesoft Online Training

Tableau on AWS – What Architecture?

We identify successful Tableau deployment when someone unknown to us requests their account to see the latest dashboard where someone else (also unknown) published an insightful viz. As the need for more data is constantly growing, you want your Tableau to be able to keep up with the growing demand.

You should consider an infrastructure that allows you to scale as the need grows and remains cost efficient. It implies the possibility to scale both your databases and your Tableau Server simultaneously.

A strong answer to such flexibility and robustness is to deploy both of your DB and your Tableau Server on AWS. A full AWS approach is powerful, scaleable and cost efficient. Let’s take a look at the different options you should consider.

Almost… But for now, let’s focus on the services that will help you set up your BI Stack, a database and a Tableau Instance. We will keep things simple and assume no need for an ETL Tool. Lets look at EC2, RDS, Redshift & EMR, their advantages and disadvantages when working with Tableau. For more skills Tableau Training

Option 1: Tableau Server + Database on EC2.

AWS EC2 are simple virtual machines on which you can install anything you want. Let’s create a simple scenario where you install your DB on an EC2 Instance and a Tableau Server on another one.

This type of architecture is easy to set up and will work for most companies that begin with Tableau and a small DB. This type of deployment is fairly standard and similar to what you would see in an on-premise situation.

Keep in mind that when you want to increase your DB or Tableau Server performances, you can simply put more hardware on your EC2 machines. There will be a downtime but it should be quick enough not to cause much trouble.

The good side of having 2 EC2 instances communicating together is the flexibility you have when picking your DB technology. If you are not a fan of MYSQL (like me), you can deploy any type of DB that Tableau can connect to and you are good to go. You can pick 2 different instance sizes, like having a small instance for your DB and a larger one for your Tableau Server and run most of your analytics on top of Tableau extracts. The main advantage is the speed to deployment. Within a couple of minutes you have your Tableau Server up and running associated with your DB. All of that can scale up to a reasonable limit before designing larger architecture.

The disadvantages of this kind of solution may be some work later down the line when the need to scale up or when the need for a fancier solution arises. When adding a Disaster Recovery (DR) on your DB and/or Tableau Instance, you already have up to more EC2 instances, add a load balancer and configure all of this yourself. It may quickly become more complex than you initially planned. Get from Tableau Server Training

Solution total cost (excluding any licences):

  • Around 650 USD per month.
    • 2X r3.xlarge 32GB Ram & 4 CPU (push it to 8 cores for more comfort)
    • Go for Linux on your DB instance as they are twice as cheap compared to a windows machine.

Option 2: Tableau Server + DB on RDS

This architecture is quite similar to our option 1 but this time we are moving our DB to RDS. I would recommend to follow this path if you are planning on using one of the DB supported by RDS listed below:

  • Aurora
  • MySQL
  • Oracle
  • PostgreSQL
  • SQL Server
  • Maria DB

cloudcraft-web-app-reference-architecture-4
The  architecture assumes your Tableau Server querying a read replica of your DB to avoid Tableau to send queries to your production DB.

Let’s avoid the classical RDS vs EC2 efficiency / cost debate. I would simply argue the following points that will help your Tableau Server:

  • The read replication capabilities to take some load off your DB. This is important from a Tableau point of view as you can imagine having 1 or more read replicas of your DB and point Tableau towards those read replicates. It is very simple to put in place and allows you to move heavy work from your main DB. It is also feasible with several EC2 instances but you would make your life unnecessarily complicated.
  • Automated backups are handled for you. You can retrieve your DB at any point in time – yes at any time up to the second level over the last 30 days and for free. You can also restore a full snapshot of your DB at any point time.
  • The simplicity of managing an RDS instance over several EC2 instances (no security to manage, no install, upgrades, patches, etc).
  • If your DB fails, AWS will handle everything for you, DR is included if you use the multi-AZ option. Learn more from Tableau Online Course

This architecture has some definite advantages over the EC2 exclusive model. If you can go for the DB models supported by RDS, I would recommend it.

Solution Total Cost:

  • Around 350 USD for your EC2 instance
    • 1X r3.xlarge 32GB Ram & 4 CPU (push it to 8 cores for more comfort)
  • Around 250 USD per month for your RDS

Option 3: Tableau Server + Redshift

Redshift has been created with the mission to answer complex, large and numerous queries for Business Intelligence applications like Tableau. It is by definition what you should use in AWS if you had total freedom of architecture. Its columnar-stored model makes things fast for typical Tableau queries.

In the example above we have created a 6 Nodes instance on Redshift that will be available on our Tableau Server.

From my experience, Redshift performs really well with Tableau and I have seen very successful deployment of this type. You can scale up to Terabytes of data and have great performances for ad-hoc queries typically sent by Tableau users. Redshift can handle parallel queries (MPP) and you can add several nodes for additional computing power with no downtime.

Keep in mind that Redshift is available in only one AZ, so you cannot have a DR of your DB. If your Redshift fails and your dashboards are connected live to it, your analytics are down. For most deployment, that would not be too much of an issue but some companies may need their analytics running 24/7. You will need to answer the following question: Can I afford to lose my analytics for a couple of hours? If the answer it is no, then forget Redshift.

The very reasonable price versus its efficiency will probably solve most problems when coming to analytics at scale. This type of infrastructure is perfect for fast growing start-ups, existing slow deployments and for larger companies that need to scale their data warehouse quickly and easily.

  • Around 350 USD per month for the Tableau Server
    • 1 r3.xlarge 32GB Ram & 4 CPU (push it to 8 cores for more comfort)
  • Around 250 USD per month for a 1 Node deployment. My Tip: use SSD…

Be mindful that extra costs may occur when sending data back and forth to your different AWS services.

Option 4 : Tableau with EMR

An EMR deployment answers a different type of question to “How to create a strong infrastructure for Tableau on AWS?”, but rather answers something like “How to handle a tremendous amount of data with Tableau?”. Queries against petabyte datasets are possible with Tableau but need the right infrastructure (you can forget about Tableau extracts here). You can consider Redshift with 128 nodes but the need for special tuning on the DB side and more control of how compressions / keys are handled, can be solved with an EMR instance. This kind of solution will require strong Hadoop skills.

I will discuss on how to deploy such solutions in an impending article as this type of architecture requires deeper explanation.

Tableau on AWS is awesome whatever architecture you choose…

Going for Tableau and your DB sitting on AWS will make it easy to manage, fast, scaleable and affordable. AWS offers different possible infrastructures and all of them will have some advantages and disadvantages. In most scenarios I would recommend to use RDS over an EC2 Instance for your DB. For more robustness and larger datasets, my recommendation would be to consider Redshift quickly. For humongous datasets (Petabytes) or HA on the Tableau Server let’s be realistic and acknowledge that your infrastructure will be more complex than previously discussed architectures.

To get in-depth knowledge, enroll for a live free demo on Tableau Online Training

How to Integrate R and Tableau

Tableau – R Integration

Together, R and Tableau could be extremely useful in today’s data science arena as together it can unravel any organization’s end to end information discovery needs.
R has become one of the foremost widely used statistical software packages among statisticians and researchers since it provides more than 10000 specialized packages. Tableau takes only seconds or minutes to visualize using a simple to use drag-and-drop interface. For more details Tableau Training
Here in this blog, we will go through the steps of integrating R and Tableau.
Prerequisite to follow below steps: R and tableau is already installed

Step 1:

Inside R software, install Rserve package with below command.
install.package(Rserve)

Once the installation for the package is complete, we run the package with the command below.
library(Rserve);Rserve()

This will start a Server in the background irrespective of whether R console is open.

Step2:

Now we move to Tableau to perform connection to the server we just started.
While startup page, go to Help→ Settings and Performance → Manage External Service connection.

This will prompt a small window where server name is localhost and port 6311 is to be set.
Press test connection to get the successful message. And then press OK.

This proves the connection to Rserver is complete.
We will now see a small example if it works for us.
Taking a small sample data inside Tableau.
Sampledata:

Importing Data in Tableau

You may see sample data form a tabular structure.
Now change the tab from Database to Sheet. Learn Tableau Server Training

Now we see how the calculation happens with the help of Rserver.
Problem Statement: Calculate Total Expense done.
Solution:

Step3:

Go to Analysis Tab and select Create-Calculated-Field

Now Give a Name to Field.
As I have given TolalExpense and click Apply.

Now write a Script which will run in R.
For my case the Script is:
SCRIPT_INT( ” ToExp <- .arg1 ” , SUM([Jan]+[Feb]+[Mar]) )
Explanation: we have SCRIPT_INT as the script will return integer type.
Test between “ ”, is the script running in Rserver. And .agr1 will take function SUM as value to process data.

A message displays when we Apply. Our script is pushed to Rserver and checked if the calculation is valid or not.
Press OK to save the script and come back to Tableau to visualize our query.

Step4:

Drag and Drop the Fields to Visualize data. Also, we can see our solution has created a field which we can drag and compare with other fields.

To get in-depth knowledge, enroll for a live free demo on Tableau Online Training

What is Tableau and its Tools types

What is Tableau?

Tableau is a powerful and fastest growing data visualization tool used in the Business Intelligence Industry. It helps in simplifying raw data into the very easily understandable format.

Data analysis is very fast with Tableau and the visualizations created are in the form of dashboards and worksheets. The data that is created using Tableau can be understood by professional at any level in an organization. It even allows a non-technical user to create a customized dashboard.

The best feature Tableau are

  • Data Blending
  • Real time analysis
  • Collaboration of data

The great thing about Tableau software is that it doesn’t require any technical or any kind of programming skills to operate. The tool has garnered interest among the people from all sectors such as business, researchers, different industries, etc.

  1. Developer Tools: The Tableau tools that are used for development such as the creation of dashboards, charts, report generation, visualization fall into this category. The Tableau products, under this category, are the Tableau Desktop and the Tableau Public.
  2. Sharing Tools: As the name suggests, the purpose of the tool is sharing the visualizations, reports, dashboards that were created using the developer tools. Products that fall into this category are Tableau Online, Server, and Reader. For more details Tableau Training

Let’s study all the products one by one.

Tableau Desktop

Tableau Desktop has a rich feature set and allows you to code and customize reports. Right from creating the charts, reports, to blending them all together to form a dashboard, all the necessary work is created in Tableau Desktop.

For live data analysis, Tableau Desktop provides connectivity to Data Warehouse, as well as other various types of files. The workbooks and the dashboards created here can be either shared locally or publicly.

Based on the connectivity to the data sources and publishing option, Tableau Desktop is classified into

  • Tableau Desktop Personal: The development features are similar to Tableau Desktop. Personal version keeps the workbook private, and the access is limited. The workbooks cannot be published online. Therefore, it should be distributed either Offline or in Tableau Public.
  • Tableau Desktop Professional: It is pretty much similar to Tableau Desktop. The difference is that the work created in the Tableau Desktop can be published online or in Tableau Server. Also, in Professional version, there is full access to all sorts of the datatype. It is best suitable for those who wish to publish their work in Tableau Server.

Tableau Public

It is Tableau version specially build for the cost-effective users. By the word “Public,” it means that the workbooks created cannot be saved locally, in turn, it should be saved to the Tableau’s public cloud which can be viewed and accessed by anyone.

There is no privacy to the files saved to the cloud since anyone can download and access the same. This version is the best for the individuals who want to learn Tableau and for the ones who want to share their data with the general public.

Tableau Server

The software is specifically used to share the workbooks, visualizations that are created in the Tableau Desktop application across the organization. To share dashboards in the Tableau Server, you must first publish your work in the Tableau Desktop. Once the work has been uploaded to the server, it will be accessible only to the licensed users.

https://tpc.googlesyndication.com/safeframe/1-0-37/html/container.html However, It’s not necessary that the licensed users need to have the Tableau Server installed on their machine. They just require the login credentials with which they can check reports via a web browser. The security is high in Tableau server, and it is much suited for quick and effective sharing of data in an organization. Learn more from Tableau Online Course

The admin of the organization will always have full control over the server. The hardware and the software are maintained by the organization.

Tableau Online

As the name suggests, it is an online sharing tool of Tableau. Its functionalities are similar to Tableau Server, but the data is stored on servers hosted in the cloud which are maintained by the Tableau group.

There is no storage limit on the data that can be published in the Tableau Online. Tableau Online creates a direct link to over 40 data sources that are hosted in the cloud such as the MySQL, Hive, Amazon Aurora, Spark SQL and many more.

To publish, both Tableau Online and Server require the workbooks created by Tableau Desktop. Data that is streamed from the web applications say Google Analytics, Salesforce.com are also supported by Tableau Server and Tableau Online.

Tableau Reader

Tableau Reader is a free tool which allows you to view the workbooks and visualizations created using Tableau Desktop or Tableau Public. The data can be filtered but editing and modifications are restricted. The security level is zero in Tableau Reader as anyone who gets the workbook can view it using Tableau Reader.

If you want to share the dashboards that you have created, the receiver should have Tableau Reader to view the document.

How does Tableau work?

Tableau connects and extracts the data stored in various places. It can pull data from any platform imaginable. A simple database such as an excel, pdf, to a complex database like Oracle, a database in the cloud such as Amazon webs services, Microsoft Azure SQL database, Google Cloud SQL and various other data sources can be extracted by Tableau.

When Tableau is launched, ready data connectors are available which allows you to connect to any database. Depending on the version of Tableau that you have purchased the number of data connectors supported by Tableau will vary.

The pulled data can be either connected live or extracted to the Tableau’s data engine, Tableau Desktop. This is where the Data analyst, data engineer work with the data that was pulled up and develop visualizations. The created dashboards are shared with the users as a static file. The users who receive the dashboards views the file using Tableau Reader.

The data from the Tableau Desktop can be published to the Tableau server. This is an enterprise platform where collaboration, distribution, governance, security model, automation features are supported. With the Tableau server, the end users have a better experience in accessing the files from all locations be it a desktop, mobile or email.

To get in-depth knowledge, enroll for a live free demo on Tableau Online Training

Integrating Tableau With Hadoop

Tableau, a leading Business Intelligence company, allows instant insight by transforming data into interactive visualizations called dashboards. It is a quick and easy tool for data analysis, visualization and information sharing.

Tableau connects easily to nearly any data source currently available in the market, whether it be a corporate Data Warehouse, Microsoft Excel or web based data. And what’s more, Tableau can also be connected to multiple flavours of Hadoop.

“How we can integrate Tableau with Hadoop”. I don’t want to be technical and say that with the Apache Hive (via ODBC connection), we can integrate the Tableau software with Hadoop. To make it easier to understand, let’s first know more about the prerequisites to the integration.

Firstly, Hive, as well as one of the very well-known Hadoop vendors (Cloudera, Hortonwork, and MapR ) should be installed in the system. We can say that Tableau now supports the ability to visualize complex large data stored in Cloudera’s, Hortonworks’, and MapR’s distribution via Hive and the Cloudera, Hortonworks, and MapR Hive ODBC driver. For more details Tableau Training

Once Hadoop is connected with Tableau, we can bring data in-memory and do fast ad-hoc visualizations. We can even see patterns and outliers in all that data that’s stored in our Hadoop cluster. With this integration, we can’t get any value from the data unless we can see what is there inside of it.

In today’s evolving technology landscape, with the essential key being outperforming competitors, Tableau’s solution for Hadoop is one of the most elegant solutions there is. It provides the most desired performance, quickly and easily.

It prevents any need for us to move huge log data into the Relational store before analysing it with Tableau and makes it more accessable. Also Tableau Software enables businesses to keep pace with the competitors through an adaptive and intuitive means of visualizing their data.

Tableau lets us bring our data into its fast, in-memory analytical engine. With this approach we can query an extract of data without waiting for MapReduce queries to complete. We can just click to refresh the extract or schedule automatic refreshes.

However, we should also pay attention to technology merging effects and the fact that the Hive service does not relay information about query progress to Tableau for data accessing. It also does not provide an interface for cancelling the requested queries. Hadoop’s known drawback is its high latency. learn from Tableau online Course

When we work with Hadoop and Tableau, we can connect live to our Hadoop cluster and then extract the data into Tableau’s fast in-memory data engine. This can be a limitation, as to get the benefit of ad hoc visualizations at interactive speeds, we need to be able to move fast.

We can conclude that Hadoop reporting is faster, easier and more efficient with Tableau. Tableau’s solution for Hadoop is elegant and performs very well. This obviates the need for us to move huge log data into a relational store before analyzing it. This makes the whole process seamless and efficient.

To get in-depth knowledge, enroll for a live free demo on Tableau Online Training

workday integration with salesforce benefits

At Salesforce, the Customer Success Platform and world’s #1 CRM, we are always listening to our customers’ needs. More recently, we discovered that many of our joint Workday customers asked for better and simpler ways to bring their back-office data together with their CRM data.

That’s why I’m excited to announce that Salesforce has partnered with Workday, a leading provider of enterprise cloud applications for finance and human resources , to launch the Workday Financial Management Connector.

The Workday Financial Management Connector, now available on the Salesforce AppExchange, allows customers to quickly bring together Workday Financial Management data with Salesforce CRM data. For more Workday Training
As a customer of both Workday and Salesforce, how might this help you?

  • Deliver more timely and accurate invoices to customers
  • Significantly reduce time-to-payment on invoices, ultimately accelerating cash flow
  • Improve overall customer satisfaction due to stronger transparency between sales, finance and operations
  • Eliminate manual or duplicate processes, reduce errors, and increase visibility across the Quote-to-Cash process
  • Improve customer satisfaction with deeper alignment between sales, finance and operations on key business initiatives
  • Provide early visibility into pre-closed or preapproved Projects to support optimized Resource Management early in the project lifecycle
  • Track time, costs, and revenue associated with sales opportunities for insight into opportunity costs and profitability. Learn from Workday HCM Online Training

With the Workday Financial Management Connector, administrators can map any object in Salesforce to objects in Workday, with complete control over conditions and timing of the data synchronization. With Workday Financial Management Connector, administrators can map any object in Salesforce.com to objects in Workday, with complete control over conditions and timing of the data synchronization.

Benefits for Sales & Finance
• Eliminate manual processes, reduce errors and increase visibility.
• Improve customer satisfaction with deeper alignment between sales, finance and operations on key business initiatives.

Benefits for IT
• Easily and quickly configure the integration without costly integration developers, reducing administrative burden and maintenance after deployment.
• Simple scenario mapping and user-friendly dashboards are provided for a seamless experience within the Salesforce.com user interface.

To get in-depth knowledge, enroll for a live free demo on Workday Online Training

Servicenow Interview Questions and Answers

What is ServiceNow?

ServiceNow is a cloud-based IT Service Management tool. It offers a single system of record for IT services, operations, and business management.

What is the full form of CMDB?

The full form of CMDB is Configuration Management Database.

Name all the products of Services now

ServiceNow offers various type of tools which is design according to the need of a specific user.

  • Business Management Applications
  • Custom Service Management
  • IT Service Automation Application
  • HR management

What is the use of record matching and data lookup features in ServiceNow?

  • Data lookup and record matching allow you to define field value based on a specific condition in place of writing scripts. For more Servicenow Training

Explain the term “Business Rule.”

  • The business rule is server-side scripting. It executes whenever any record is inserted, modified, deleted, displayed or queried. The vital point to keep for creating a business rule is that when and on what action it suppose to execute. You can apply the business rule ‘on display,’ ‘on before’ or ‘on after’ when action is performed.

Can you call a business rule with the help of a client script?

  • Yes, it is possible to call a business rule using a client script. However, you can also use glide ajax for the same.

How to enable or disable an application in ServiceNow?

Following steps will help you do the same:

  • Navigate to “Application Menus” module
  • Open the respective application.
  • Set value for active as ‘true’ to enable it or set it to ‘false’ to disable it.

What is a view?

View defines the arrangement of fields on a form or a list. For one single form we can define multiple views according to the user preferences or requirement.

What is ACL?

An ACL is access control list that defines what data users can access and how they can access it in ServiceNow Certification

What do you mean by impersonating a user? How it is useful?

Impersonating a user means giving the administrator  access to what the user would have access to. This includes the same menus and modules. ServiceNow records the administrator activities when the user impersonates another user. This feature helps in testing. You can impersonate that user and can test instead of logging out from your session and logging again with the user credentials.

What are dictionary overrides?

Dictionary overrides provide the ability to define a field on an extended table differently from the field on the parent table. For example, for a field on the Task [task] table, a dictionary override can change the default value on the Incident [incident] table without affecting the default value on Task [task] or Change [change].

What do you mean by coalesce?

Coalesce is a property of a field that we use in transform map field mapping. Coalescing on a field (or set of fields) lets you use the field as a unique key. If a match is found using the coalesce field, the existing record will be updated with the information being imported. If a match is not found, then a new record will be inserted into the database.

What are UI policies?

UI policies dynamically change information on a form and control custom process flows for tasks. UI policies are alternative to client scripts. You can use UI policies to set mandatory fields,which are read only and visible on a form. You can also use UI policy for dynamically changing a field on a form.

What is a data policy?

With data policies, you can enforce data consistency by setting mandatory and read-only states for fields. Data policies are similar to UI policies, but UI policies only apply to data entered on a form through the standard browser. Data policies can apply rules to all data entered into the system, including data brought in through email, import sets or web services and data entered through the mobile UI.

What is a business rule?

Business rule is server side scripting that executes whenever a record is inserted, updated, deleted, displayed or queried.The key thing to keep in mind while creating a business rule is that when and on what action it has to execute. You can run the business rule ‘on display’, ‘on before’ or ‘on after’ of an action (insert,delete,update) is performed. Learn programming skills from servicenow developer training

Can you call a business rule through a client script

Yes you can call a business rule through a client script by using glideajax

What is a glide record?

Gliderecord is a java class that is used for database operations instead of writing SQL queries.

What do you mean by data lookup and record matching?

Data lookup and record matching feature helps to set a field value based on some condition instead of writing scripts. For example:on Incident forms, the priority lookup rules sample data automatically sets the incident Priority based on the incident Impact and Urgency values. Data lookup rules allow to specify the conditions and fields where they want data lookups to occur.

What is an update set?

An updated set is a group of customization.It captures the customization or configuration changes made by a user and then these update sets can be moved from one instance to another. For example, if we made some configuration changes in our development environment and want some changes in our test environment then we can capture all the changes in an update set and can move this update set to the test environment instead of doing changes manually in a test environment.

What is a sys_id?

A unique 32-character GUID that identify each record created in each table in servicenow

What are LDAP Integration and its use?

LDAP is Lightweight Directory Access Protocol. It is used for user data population and User authentication. Servicenow integrates with LDAP directory to streamline the user log in process and to automate the creation of user and assigning them roles

What Is The Use Of Service Now Change Management Application?

The ServiceNow Change Management application provides a systematic approach to control the life cycle of all changes, facilitating beneficial changes to be made with minimum disruption to IT services.

ServiceNow Change Management integrates with the Vulnerability response plugin to introduce extra functionality within Change Management.

What is transform Map?

A transform map transforms the record imported into ServiceNow import set table to the objective table. It additionally decides the connections between fields showing in an Import Set table and fields in the target table. For more info Servicenow Course

What do you mean by Foreign record insert?

A foreign record insert occurs when an import makes a change to a table that is not the target table for that import. This happens when updating a reference field on a table.

Which searching technique is used to search a text or record in ServiceNow?

Zing is the text indexing and search engine that performs all text searches in ServiceNow.

What does the Client Transaction Timings plugin do?

The Client Transaction Timings plugin enhances the system logs by providing more information on the duration of transactions between the client and the server. By providing information on how time was spent during the transaction, performance issues can be tracked down to the source by seeing where the time is being consumed.

What is inactivity monitor?

An inactivity monitor triggers an event for a task record if the task has been inactive for a certain period of time. If the task remains inactive, the monitor repeats at regular intervals.

What is domain separation?

Domain separation is a way to separate data into (and optionally to separate administration by) logically-defined domains.

For example, A client XYZ have two business and they are using ServiceNow single instance for both businesses.They do not want that user’s from one business can see data of other business.Here we can configure domain separation to isolate the records from both businesses.

How can you remove Remember me checkbox from login page?

You can set the property – “glide.ui.forgetme” to true to remove the Remember me checkbox from the login page.

What is HTML Sanitizer?

The HTML sanitizer automatically cleans up HTML markup in HTML fields to remove unwanted code and protect against security concerns such as cross-site scripting attacks. The HTML sanitizer is active for all instances starting with the Eureka release.

What are Gauges?

A gauge can be based on a report and can be put on a homepage or a content page.

What do you mean by Metrics in ServiceNow?

Metrics record and measure the workflow of individual records. With metrics, customers can arm their process by providing tangible figures to measure, for example, how long it takes before a ticket is reassigned or changes state.

How many types of search be available in ServiceNow?

Use any of the following searches to find information in ServiceNow:

  • Lists: find records in a list;
  • Global text search: find records in multiple tables from a single search field.
  • Knowledgebase: find knowledge articles.
  • Navigation filter: filter the items in the application navigator.
  • Search screens: use a form­like interface to search for records in a table. Administrators can create these custom modules.

What is a BSM Map?

BSM Map is a Business Service Management map.It graphically displays the configuration items (CI) that support a business service and indicates the status of those configuration items.

To get in-depth knowledge, enroll for a live free demo on Servicenow Online Training

Design a site like this with WordPress.com
Get started