Connectors between MuleSoft’s Anypoint Platform and Google BigQuery will make it easier to combine data sets for line of business users.
Salesforce’s MuleSoft unit said it will enable its Anypoint Platform to run on Google Cloud Platform so joint customers can connect services like BigQuery to enterprise applications more easily.
MuleSoft is used to manage business applications and connect them within enterprises via application programming interfaces or APIs.
Salesforce acquired MuleSoft last year for $6.5 billion in what amounted to a hybrid cloud play and the beginning of the company’s integration cloud and Customer 360 efforts. For more Mule 4 Training
Specifically, MuleSoft says it will extend its Anypoint Runtime Fabric to Google Cloud, and enterprises will be able to aggregate data in Google Cloud to any other data source via a BigQuery connector in MuleSoft’s Anypoint Exchange. MuleSoft offers a series of pre-built connectors, templates, and APIs on its Anypoint Exchange.
Additionally, a new BigQuery connector in Anypoint Exchange will help line-of-business owners combine datasets — from disparate sources like Salesforce and Google Analytics — to make informed decisions.
This means line-of-business users, like marketers, can derive better real-time data insights around segmentation and personalization by leveraging Google Cloud’s strengths and BigQuery’s advanced querying capabilities.
“Data is the most valuable resource that organizations have today,” said Kevin Ichhpurani, corporate vice president, Google Cloud. “These new offerings from MuleSoft mean customers can make better decisions with their data by breaking down silos and by leveraging Google Cloud’s core competencies in areas like AI, ML and cloud analytics.” Learn more skills from Mulesoft Training
“In this digital age, organizations need to evolve and adapt to new architecture trends and deployment modes, like microservices, IoT, hybrid cloud and more. With Anypoint Runtime Fabric, IT can easily deploy in any environment,” said Mark Dao, chief product officer, MuleSoft.
“Our platform, together with Google Cloud, will enable customers to unlock data through API-led connectivity and maximize their existing investments across public and private clouds, while maintaining security and control. This allows organizations to future-proof their business so they can focus on delivering innovation for many years to come.”
For enterprises, the MuleSoft connector will make it easier to analyze data with Google’s BigQuery platform and combine data sets between disparate sources. Google’s BigQuery is increasingly popular among enterprises looking to analyze data.
MuleSoft said its Anytime Runtime Fabric will support Google Cloud Platform in 2020. The BiqQuery connector will be available in Anypoint Exchange before the end of the year.
About Anypoint Platform
MuleSoft’s Anypoint Platform is a leading application network platform. It allows organizations to create composite applications that connect apps, data, and devices through API-led connectivity to form a flexible application network. Anypoint Platform is a unified, single solution for iPaaS and full lifecycle API management, both on-premises and in the cloud.
MuleSoft Certification: MuleSoft provides integration between businesses to connect data applications and devices across cloud platforms. It includes various tools to develop, manage and test API which supports these connections.
MuleSoft certification:
MuleSoft offers three levels of certifications
Associate: This is beta level exam i.e MuleSoft Certified Developer-Associate
Specialist: MuleSoft Certified Architect-Solution exam is the first level exam in MuleSoft at the architect level.
Professional: MuleSoft Certified Developer-Integration is MuleSoft’s second level assessment for integration development.
Let us see the certification categories in brief in these three levels of MuleSoft certifications.
When you have worked in the area of Integration and Associate, you can switch to the MCD–Integration and API Associate is competent with the development of MuleSoft and can create single-handed, easy to moderate projects.
After the completion of Design of Anypoint Platform, and MuleSoft training, people can also enoll UI Design course. If you have good experience in technology and have mastered the technology. You can decide which course is the right choice for you.
Mulesoft certified developer is the first level exam in the developing integrations and Anypoint platform.
Prerequisites:
Java (preferred) knowledge, or specific object-oriented language.
Deep knowledge of data formats like XML, CSV, and JSON.
A clear understanding of traditional integration technologies like HTTP, JMS, JDBC, REST, and SOAP.
API Design Associate:
This API certificate may go to the MCD-API Design Associate for the design of the application. It helps you understand the core concepts of the “RESTful API Modeling Language” (RAML 1.0) and can design RESTful APIs with solutions from MuleSoft.
MuleSoft Certified Developer-Development Associate is MuleSoft’s first level examination. To get this MuleSoft certification you must create RESTful APIs using RAML and Anypoint Platform. The certification also tests your knowledge of RAML 1.0 REST APIs from MuleSoft’s Anypoint Platform.
Prerequisites:
There are no prerequisites to become a API Design Associate.
Mulesoft Certified Architect:
Solution Design Specialist: If you are an Architect consultant, you should go to the MCA–Solution Design Specialist certificate and you can make strategic decisions to build business development approaches for Anypoint Platform. for more info Mule Training
Prerequisites for Mulesoft certification:
Knowledgeable with popular software development tools such as Git / GitHub, Maven, Jenkins or the like.
Extensive knowledge of key business integration ingredients including interface requirements and contracts; data encoding using XML or JSON; REST APIs or SOAP web services; access to the SQL or Or NoSQL database; JMS, AMQP or related message-passing; network protocols including TCP / IP, HTTP, and HTTPS; single-resource transactions.
Mastering the ability to read procedural, object-oriented, and (ideally) functional code in any JVM-based programming language.
Integration Professional: MCD–Integration Specialist is experienced with the production of real-world MuleSoft, and can build complex projects on his own. Developers will be given great importance if they are holding this prestigious MuleSoft certification. This implies the opportunity to provide professional leadership on the development of the MuleSoft project.
Prerequisites:
You should have the equivalent awareness of the MCD–Integration and API Associate passing course on Anypoint Application Development and MuleSoft. UI Development.
You should have experience in object-oriented languages like Java.
Capacity to access the command-line interface.
How to prepare for Mulesoft Certification?
Criteria And guidelines understanding:
Ensure you understand and meet the criteria. It’s an easy job but sometimes ignored. Knowing exactly what needs to be done will save you from making false conclusions and revisiting missed key topics.
Syntax and errors:
Note, you are evaluated as a developer by this test. Which means you have to learn how to build or write the code. While reviewing the modules make sure that you read and understand the log messages, attributes, events, variables, etc. listed in your Anypoint Studio template for each of the phases. Mastering those will help you pass the test with confidence.
Focus and discipline:
Each of the world’s preparation and instruction is only as important as how it is absorbed and used. You must focus on your goal. Pick a date for your exam. Then build a timetable for completing the modules, don’t forget a final analysis before the exam.
It is equally important to stick to it, as it is important to have a schedule. Provide ample buffer time for unforeseen incidents, but don’t let it cause you to procrastinate in the preparation.
Conclusion:
I hope you got a brief understanding of MulesSoft certification. If you want to clear any of the certifications, you can always go forMulesoft Online Training. I hope you will succeed in your MuleSoft certification.
Data Discovery, Data Management, and Reporting are the three main functionalities of Business Intelligence applications. Business Intelligence software has permitted organizations to stay aware of the unabating march of information complexity, making users free from entrenched ways of the past, making them comfortable with machines getting more intelligent, information democracy rising, and BI differentiating the winners from the losers.
Despite the role of the Tableau as a self-service Business Intelligence innovator and its increasing share of the market, the vendor now faces stiff competition from several competitors.
Here is the list of top alternatives for Tableau:
Sisense
Sisense permits users to transform information into profoundly valuable insights and share them with colleagues, and customers through intuitive dashboards. Also, it is one of the leading business intelligence software for many, organizations, extending from beginners and established companies. It is an excellent business intelligence tool that analyses and visualizes both big and different datasets, in real-time.
Looker:
Looker is a data discovery application using which users can create and offer reports effectively to support other functional groups, adequately helping organizations drive their exercises and choices the correct way. Looker likewise offers a flexible pricing plan and open API reconciliations. The interface is intuitive, and the application is intended to take out information bottlenecks. For more details Tableau Training
Zoho Analytics:
Zoho Analytics is a self-service Business Intelligence and Analytics software that permits you to make keen dashboards and information visualizations. An easy to understand tool that is easy to set up, Zoho Analytics is intended for use by SMBs who look for a modest yet effective platform for their business needs. Start-ups will acknowledge the majority of its features, which incorporate Data Visualization, and online joint effort among colleagues, among other helpful business applications. For a developing organization, there is an enterprise version accessible that is more instinctive than what most competitors offer.
CXAIR:
CXAIR is intended to be utilized by organizations that manage large volumes of information every day. These include Financial institutions, Retail foundations, and Healthcare. These associations need to extract valuable bits of knowledge from the information they find and assemble. With CXAIR, you can combine separate information streams and record them. What’s more, since it is fuelled by Apache’s Lucene internet searcher technology, you can recover information effectively and precisely. This and several other highlights can be tried at no cost with the CXAIR Platform’s free trial.
ReportPlus:
ReportPlus gives you real-time dashboards, insightful reports, and accessibility at anytime and anywhere to monitor and stay on top of your business processes’ performance. The software offers architecture diagrams that are uniquely designed using your data, regardless of whether it’s On-premise or in the Cloud. Its Cloud-based version lets you connect your data to Cloud services, or On-premise SQL databases, offer Excel spreadsheets in real-time. It allows the creation and analysis of dashboards anytime and anywhere and empowers self-service business intelligence without the assistance of an IT professional.
Spotfire:
Spotfire is available as a desktop application for Windows or as a Cloud-based solution. Organizations need to pay to permit Spotfire Desktop applications for end clients, not like Power BI or Qlik Sense.
These are the toughest competitors of tableau in the market. However, there are plenty of viable alternatives for Tableau, the Business Intelligence software market, but there are also offers a steep curve of learning that keeps many buyers from doing enough research.
The recent proliferation of software as a service (SaaS) providers in the market has greatly impacted the way we think about enterprise architecture. Data residing outside the enterprise firewall needs to be controlled and managed – a problem further exacerbated by increasingly popular bring your own device (BYOD) policies.
When employees demand access to data within the firewall, from anywhere using any device, it becomes an overarching integration challenge.
As a result, the information technology world is undergoing a massive shift, paving way for a major change in IT as well as the need for a new architecture. What is missing is the ability to integrate anything, anywhere. For more info Mulesoft Training
Hybrid Integration Solves the Problem
Hybrid integration bridges the network divide between your existing enterprise (databases, warehouses, applications, and legacy systems) and SaaS/PaaS, B2B (partners & suppliers), B2C (customer engagement), BYOD (enterprise mobile), and big data. Hybrid integration solves the issue of taking existing information from on-premises systems.
It leverages new systems to make way for innovation, competitive advantage, and driving new business models. The updated enterprise deals with emerging trends in the market, while leveraging the data and functionality of on-premises legacy applications.
Hybrid integration allows on-premises applications to seamlessly integrate with cloud based applications. Businesses want to connect their existing custom and packaged solutions and create a single platform for new services.
MuleSoft helps enterprises connect applications both on-premises and in the cloud. CloudHub and Mule as an ESB, both part of MuleSoft’s Anypoint Platform, simplify the integration process and allow for seamless hybrid integration.
The hybrid integration model also provides a secure data gateway which allows for protected communication between CloudHub and Mule as an ESB, allowing the development of hybrid architecture in which you have control over the data passed between specific applications. Learn more skills from Mule Training
Why Hybrid Integration?
Converting to an all-cloud integration application system is not always the best solution for all enterprises; nor is continuing with out-of-date legacy systems. Hybrid cloud integration provides the perfect middle ground solution for enterprises, assuring that data from on-premises legacy systems can integrate with cloud data, ensuring businesses have the full advantage when driving business forward.
Enterprise Disposes of Nothing: To maximize investment in new applications, it is essential to combine both on-premises and cloud systems. Presenting a service layer over legacy apps allows access to important information and the leveraging of new applications, wherever they reside.
Regulatory Compliance: Full cloud integration solutions cause problems with regulatory compliance, as some data must remain within the enterprise firewall. Some countries forbid data to leave its country of origin, thus converting to a cloud-only based system is not possible. These restrictions warrant hybrid integration as the best solution.
Security & Privacy: Businesses are concerned with sensitive data being stored in the cloud, and with cloud integration, pushing data outside the firewall would be the only option.
However, with hybrid integration, sensitive data remains on-premises while insensitive data can stay in the cloud, giving companies the opportunity to segregate and track movement. Businesses decide what data is stored in the cloud and what data is stored on-premises. Get more details from Mulesoft Certification
Everyone is Innovating: While many organizations are moving towards cloud integration, not all are doing so immediately. With hybrid integration, business have a platform which spans both on-premises and cloud integration, allowing them to move towards cloud integration at their own pace.
Innovating and moving towards cloud integration moves businesses forward, it’s just a matter of time.
Why MuleSoft for Hybrid Architecture?
Mule as an ESB and CloudHub are strong platforms that provide exactly what businesses need. Unlike other vendors who offer similar services, MuleSoft has a strong track record, a powerful cloud offering, and is a trusted vendor.
Furthermore, MuleSoft diminishes the need for multiple development teams, as it provides a simple user experience in which users have access to the same concepts, tools, and capabilities, regardless of where businesses want to deploy.
With MuleSoft’s distinct integration platform, businesses need only to develop their integrations once and are free to deploy them anywhere – on-premises or in the cloud.
MuleSoft offers the unique advantage of providing two platforms that function as one. Mule as an ESB handles on-premises integration and CloudHub handles cloud-based integration. Furthermore, with CloudHub, MuleSoft manages the infrastructure, ensuring its scalability and flexibility.
Mule as an ESB and CloudHub work together as a single platform, with the same tools and features, providing a unified platform for integration on-premises, cloud, or hybrid – allowing integration of anything, anywhere.
Leveraging MuleSoft for hybrid architecture also offers the flexibility of moving to the cloud when you are ready. There is no need to rush, MuleSoft lets you move at your own speed.
MuleSoft’s Anypoint Platform provides a powerful ESB and iPaaS platform, not simply a toolkit. Other vendors just don’t compare. By presenting a unified platform, Anypoint Platform simplifies the user experience, both on-premises, cloud. MuleSoft enables over 1,600 organizations in more than 60 countries to build application networks that increase the clock speed of business.
You can show titles, captions, and tooltips on any sheet. After you add a title or caption you can edit and format the text as well as modify the shading and border. If a title or caption is not showing, from the top menu, go to the menu for the current sheet type (Worksheet, Dashboard, or Story) and select Show Title or Show Caption.
A legend card appears in the worksheet when you encode marks by dropping them on the Color or Size cards. You can format the legend font, shading, border, and alignment. You can also edit the titles that appear on each legend.
Edit worksheet titles, legend titles, or captions (Tableau Desktop only)
Do one of the following:
If you are editing a worksheet title on Tableau Server or Tableau Online web editing, double click the item you want to change. Worksheet captions and legend titles cannot be edited in web editing.
Right-click (control-click on Mac) the item you want to change and select Edit <item>, for example, Edit Title.
On a worksheet, hover on the title, click the drop-down arrow on the right-hand side and select Edit Title or Edit Caption from the context menu.
In the Edit dialog box, modify the text and format the font, size, style, color, and alignment. Use the Insert menu to add dynamic text such as sheet properties and field values. Click OK. For more details Tableau Training
Format borders and shading for a title, legend, or caption (Tableau Desktop only)
Right-click (control-click on Mac) the title, caption, or legend and select Format <item>—for example, Format Title.
In the Format pane, use the drop-down lists to change the default shading and border.
Edit dashboard titles
To edit a dashboard title:
In a dashboard, double-click the title.
In the Edit Title dialog box that appears, format the title as you like.
You can enter a new title for the dashboard or a description, as well as change the font type, size, emphasis, color, and alignment. You can also type in a website URL and Tableau will automatically create a hyperlink.
When finished, click OK.
The dashboard title updates with the changes.
Format tooltips
Tooltips are details that appear when you rest the pointer over one or more marks in the view. Tooltips also offer convenient tools to quickly filter or remove a selection, select marks that have the same value or view underlying data.
To edit a tooltip:
On the Marks card select Tooltip. Tooltips are specified for each sheet and can be formatted using the formatting tools along the top of the Edit Tooltip dialog box. Use the Insert menu at the top of the dialog box to add dynamic text such as field values, sheet properties, and more.
Use the formatting tools along the top of the Edit Tooltip dialog box.
(Optional) Use the Insert drop-down list at the top of the dialog box to add dynamic text such as field values, sheet properties, and more.
The All Fields option on the Insert menu adds all field names and values that are used in the view. Inserting the All Fields parameter updates the tooltip as you change the view. You can also use the All Fields option to exclude fields.
(Optional) Select the Include command buttons option to show filtering and view data options in the tooltip. For example, including command buttons will add Keep Only, Exclude, and View Data buttons to the bottom of the tooltip. These command buttons are available both in Tableau Desktop and when the view is published to the web or viewed on a mobile device.
(Optional) Select the Allow selection by category check box to select marks in a view that have the same value by clicking on a discrete field in a tooltip.
Business intelligence plays an integral part in organizations’ day-to-day operations.
Tableau is a popular data visualization tool that is used for business intelligence purposes.
There are a bunch of other data visualization tools in the market, but a lot of clients prefer Tableau because of its flexibility and how easy it is to analyze data.
Tableau dashboards are collections of all the different views and worksheets in one place for better analytics. There are different types of dashboards depending on the business questions that you want to answer.
For example, a typical Tableau dashboard can be one that is used by an operational team of a distribution center to see if the sales targets of the day are achieved. Such a dashboard will be different from the one used by the CEO of a company to see the performance of the different departments in the same organization.
In the case of the dashboard for the operational team, it may need to be updated with data that tells the number of orders every 10 minutes, whereas for the CEO’s dashboard, updating it only once a day may be sufficient.
In this article, I will show you 15 examples of the best Tableau dashboard examples you will find anywhere, but first, let’s learn how to set up a Tableau dashboard in 4 easy steps:
Create a blank Tableau dashboard by clicking the ‘New Dashboard’ button.
Once your new dashboard appears, locate the first sheet that you want to incorporate and drag it to your dashboard.
Drag the second sheet to where Tableau indicates on your dashboard workplace and release your cursor. Make appropriate changes from the drop-down list in the navigation of section of the dashboard and you are set.
Best Tableau Dashboard Examples
Sales Pipeline Dashboard
Some businesses require that you quickly spot out pivot opportunities in order to act appropriately.
Doing this will help you get a clearer view of your sales pipeline and know where your leads are coming from, so that you can double down on your efforts there to meet your targets.
It gives you a better understanding of the health and status of your dashboard and lets you slice data to view your sales pipeline in different layers.
This means that you will have new access to more classified data within your pipeline such as key performance indicators (KPIs), opportunity stages, sales representatives, etc.
The sales pipeline dashboard can be utilized by sales executives, managers, and sales analysts to draw conclusions on the next steps for opportunities and deal timelines.
It is also useful to analyze data for custom KPIs such as partner involvement, product category, and many more. For more info Tableau Training
Account Management 360 View Dashboard
If you are a salesperson, one very important component of your career will be data. This is because data helps you create a road map of every step you have made or are yet to do, so that you can prevent missteps in your interactions with clients.
If your client has had a bad service experience recently that you didn’t know about, or there’s a pending deal that you have lost track of, it is bound to cause problems for you along the way.
The 360 view dashboard ameliorates this problem by letting you place all of your important sales indicators on one screen to give you a better understanding of your account.
It lays out a detailed report of aspects of your business such as its structure, clients it has serviced or sold to, and how much revenue has been generated by different accounts.
The creators of this account management dashboard intend it to be used mainly by managers and sellers to map out business overviews based on customers’ success and engagement, services, and product offerings.rel =”nofollow” target=”_blank”
Executive Overview Sales Summary Dashboard
The Executive Overview dashboard gives sales managers a competent tool to track quarter to date (QTD) sales performance.
It also helps to compare the figure for the current quota against previous quarters while serving as an advanced tool for sales executives to filter product reports and opportunities based on CRM data.
With this tool, senior sales leaders can sift through tons of data and get accurate conclusions without having to manually go through a voluminous amount of spreadsheet inputs.
The implication of this overview is that it will allow sales executives to draw up new strategies quickly from the data without having to worry about a possibility of misinformation so that they can focus their attention on other areas where they are needed.
This dashboard runs mainly on current quota and comparison of historical data to spell out several business possibilities without having to overwhelm the user with unnecessary entries.
Quarterly Forecast Dashboard
The Quarterly Forecast dashboard is used by sales analysts to create quarterly forecasts for sales organizations to compare to their year on year growth.
This dashboard lets you see your business from different angles, which will enable you to see more opportunities, your business pipelines and the effect a deal will have on your business, so you will know what deals to make and the ones to run from.
You can use this dashboard to draw up comparisons between sales performances so that you can have a clearer understanding of the best forecast scenario and the likely case forecast to avoid any unnecessary surprises.
With the Quarterly Forecast dashboard, you can henceforth feel confident when creating statements to anticipate future information for your bosses, without fear of misrepresenting any variable during the set future time period.
For example, if you want to predict how many software your company will sell within the next 90 days, this dashboard will help you to compute certain assumptions to determine your future revenue.
Sales Growth Dashboard
The Sales Growth dashboard lets you measure your sales team’s performance and how much revenue can be raised within a specific time frame.
This dashboard lets you filter your sales growth by different criteria such as the segment, region, sales person’s account, and many more.
The dashboard is used by sales executives and managers to influence the formation and deployment of new business strategies.
This allows businesses to gauge the revenue growth and fix areas of deficiency because, without sufficient revenue growth, a business is susceptible to be overtaken by competitors.
There are only a couple of tools that are as potent as a good sales growth dashboard because it keeps the entire team on alert and all eyes are fixed on the sales figures and meeting the fixed time target.
This dashboard also puts team members on their toes since it sends a report on how every sales target is achieved.
Sales Territory Assignment
It is very important for businesses to assign leads or accounts to members of their team based on individual locations, industry or the size of the account.
This spells out certain specific responsibilities and forestalls any instance of conflict that may occur between sales agents, as it clarifies who is responsible for what and where.
The Sales Territory Assignment dashboard is a CRM that helps streamline your efforts if you want to assign prospects to members of your team.
This dashboard helps you define your customer segment to know how to group them appropriately when you want to deploy your strategies.
It breaks down your customer base into similar groups and presents them based on their common traits.
The most popular segments are usually by location, industry, and size, but larger numbers of leads and accounts will require a hybrid segmentation strategy whereby you will need to combine various grouping systems.
In spite of the rich selection of elements available in Mule, you may find yourself in need to put together some custom code to carry out part of a complex task, if you’re comfortable coding in Ruby, then the Ruby Component is the ideal versatile tool to fall back on for these cases.
Mule also includes also equivalent scripting components for other languages. The Ruby Component is also handy for when you’re modernizing legacy systems, as you can simply throw the old lines of code into a component instead of having to reengineer the code’s behavior through a series of different Mule components (this is not ideal from a debugging and maintenance perspective, though).
The Python script is generally executed at runtime (client-side request) and the custom logic embedded in the script could trigger an application to execute a database transaction, or modify your web-page interface.
Python also allows the developer to configure interceptors and alter the values or references of particular properties in a script. Interceptors are configured to provide additional services to a message as it flows through a component.
For example, a developer can configure an interceptor to execute scheduling or logging of a particular event while a message is being processed.
The Python component also includes a custom interceptor which allows you to configure settings for Spring elements. Use the Advanced tab to access Script Properties, then define the value and reference for a particular property in the script.
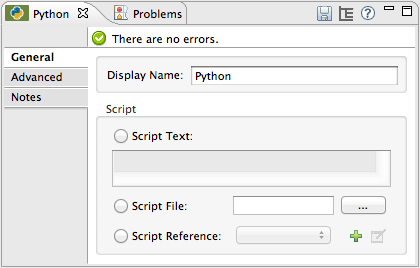
When using Python, typing-in or appending a script to the component is the only configuration required. For more details Mulesoft Online training
Configuration:
General Tab
To configure the Python component, from the Message Flow canvas double-click the Python icon to open the Properties Editor. Use the General tab to specify the file location of the script or simply type in the script on the script text window. The scripting engine is Python.
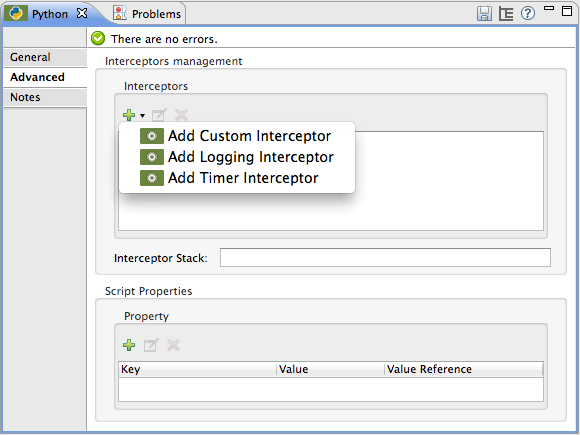
Advanced Tab
Use the Advanced tab to optionally configure interceptors and, depending on the interceptor, enter Spring values.You also have the option to specify script properties, which are key/value pairs used to alter or change properties in the script.
Interceptors
Interceptors alter the values or references of particular properties in a script. They are configured to provide additional services to a message as it flows through a component. For example, you can configure an interceptor to execute scheduling or logging of a particular event while a message is being processed.
The Script component also includes a custom interceptor which allows you to configure settings for Spring elements.
For example, you can add an interceptor that logs transactions and the time for each transaction. Use the Add Custom Interceptor to create a custom interceptor that can reference Spring objects. Learn more skills from Mule Training
The Interceptor Stack enables you to bundle multiple interceptors. Use the Interceptor Stack to apply multiple interceptors on a Python component. The interceptors are applied in the order defined in the stack.
Script Properties
Configure these parameters to define the attribute keys and their associated values. This enables the script component to quickly look up a value associated with a key.
Adding External Libraries
In Mule, Python is used through Jython. This library requires to set the environment variable python.path to correctly find the external libraries.
When deploying to a customer managed Mule runtime (one that’s deployed on-premises), then you can set the python.path property directly in the wrapper.conf file. See system properties for a better understanding of how to set it.
When deploying to a MuleSoft managed Mule runtime (deployed to CloudHub), then you must add an application property to your deployed application. Name this property python.path and set it to /opt/mule/mule-CURRENT/apps/<APPNAME>/classes.
Unleash the power of your application network and Serverless Computing to transform, innovate and stay ahead of your competition.
The transition to SaaS application adoption and cloud computing continues to accelerate for both “old” server based and “new” serverless technologies. We are starting to see that all organizations are moving toward a “serverless first” approach, similar to past movements such as “cloud first” and “cloud native.”
This serverless first mantra brings with it a “don’t lift and shift — transform” mindset. Encouraging business to deliver on the challenging business outcomes of remaining competitive, become more productive, and undergo incremental transformation.
Serverless and SaaS are simply growing into the de-facto standard for delivering business software.
How did we get to the serverless cloud?
Businesses were first consuming server-based technologies as a service on the cloud, which has since evolved to cloud serverless computing. The backbone of AWS serverless computing is AWS Lambda which supports over a dozen programming languages, and although there are containers and servers under the covers, it does not require any internal software management.
AWS Lambda was introduced by Amazon in 2014, and it was the first public cloud infrastructure vendor to offer abstract serverless computing. Though Microsoft (Azure Functions), Google (Cloud Functions), and Oracle (Compute Cloud Service) soon followed suit, the focus of this post is AWS Lambda and Anypoint Platform given how neatly they complement each other and their on-going leadership and relentless innovation in respective technologies. For more info Mulesoft Training
While AWS was launching and evolving AWS Lambda, MuleSoft was pioneering integration platform as a service (iPaaS, a form of SaaS), API lifecycle management, and low-code integration as a SaaS for accelerated delivery, innovation, and citizen integrators (aka citizen developers).
Most recently MuleSoft has been promoted a “clicks not code” approach as more organizations look to empower their employees outside of IT to unlock data and create connected customer experiences.
The trend toward low-code integration is only growing. If you are still programming in five or ten years time it will be with either JavaScript or Python, and that is a big “if” with the further future pervasiveness of low code.
So why bring MuleSoft and AWS together?
Software as a service is fundamentally API-driven and needs to be consumed as a service, which is why AWS Lambda and the MuleSoft API-led approach are so compatible.
MuleSoft is the only vendor in Gartner’s leadership positions in both the API Lifecycle Management and Integration (iPaaS) magic quadrants, while AWS is the leader in the Infrastructure as a Service (IaaS) quadrant.
This is a best of breed combination that can be leveraged for many compelling innovative and transformational use cases. Let’s dive into a little bit more detail of the benefits of both platforms before we get to an example to illustrate in part 2 of this blog.
Why MuleSoft Anypoint Platform?
Accelerated delivery and innovation: MuleSoft’s mission is to take the “donkey work” out of integration and help organizations innovate faster. You can read widely about how that is achieved via speed of delivery, actionable visibility, resilient ops, secure by design, future proof architecture, a long list of out-of-the-box connectors, intentional self-service, etc. Learn more skills from Mule Training
Widely used: MuleSoft provides the most widely used integration platform (Mule ESB & CloudHub) for connecting SaaS & enterprise applications in the cloud and on-premise, with over 175,000 developers and leading companies in almost every industry depending on it.
Advanced API and integration platform: It is recognized as the most advanced enterprise platform for designing, developing, and managing APIs and integrations.
Unified technology: Uniquely built as a single solution, Anypoint Platform can be deployed anywhere to reliably address both small-scale and mission-critical use cases.
Hybrid and multi-cloud support: Anypoint Platform enables a “write once, deploy anywhere” approach to integration assets. This is a crucial foundation for a multi-cloud (AWS/Azure/Google) strategy without being dependent on any one of them, and still supporting any on-premise solutions.
Why serverless and AWS?
Simplicity and resilience: AWS Lambda comes as a compute service that allows users to run code without provisioning or managing the infrastructure behind it. It removes the complexity of the technology stack and provides enterprise-grade uptime corresponding SLAs.
Pay per request billing model: Users do not pay for idle computing time, unlike most legacy server-based technology deployments, which can significantly impact your bottom line.
An extensive and growing number of widely used AWS services: There’s more to leverage than just AWS Lambda; there are now a large number of services that are available to use, from Alexa to AI to Glacier, that can be leveraged via APIs using MuleSoft’s AWS Connectors. These assets can all be exposed through Anypoint Platform as part of your enterprise’s application network.
Why not just use the AWS API gateway?
The AWS API gateway, in reality, is more API proxy with some basic functionalities, that apart from exposing APIs does not enable many more capabilities, management or foster speed of delivery and reuse.
It is by no means “a mature enterprise-grade API Gateway” and does not currently rank in Gartner’s API Lifecycle Management magic quadrant. Additionally, rolling your own integrations and API’s around it can be a disaster long term leading to point-to-point interfaces and point-integration solutions.
If you aren’t looking toward implementing SaaS/iPaaS and low-code tools, then it’s likely you are mostly just contributing to your organization’s technical debt.
Mule as an ESB and the Spring Framework are a powerful combination with a rich history of successful production deployments. In this article, we’ll look at some of the reasons why so many users choose Mule and Spring as their infrastructure and integration solution.
The spring framework
In the years since its first release in 2004, the Spring framework has become a de-facto enterprise Java standard in its own right.
The original goal of Spring was to allow a more modular, streamlined approach to enterprise Java development than that offered by the J2EE standards of the day, allowing a focus on specific scenarios rather than a broad specification. The basic Spring concepts of IoC and dependency injection allow dependencies and situation-specific configuration to be decoupled from program logic, allowing fast, highly flexible development. On top of this core framework, Spring developers have built a steadily growing “portfolio” of components which utilize Spring configuration techniques to handle everything from JDBC Transactions and Object Relational Mapping to JEE-style messaging, web frameworks, security, web services creation, and more on Mulesoft Training
Spring’s wide range of functionality, all configured via the same XML schema model, has made the framework a popular choice for “wiring together” multiple components in system integration projects.
Mule and spring – A powerful integration combination
Mule as an ESB, the world’s most widely used open source ESB, has been paired with Spring in production environments since its creation in 2004. Mule and Spring are a natural match – both utilize a streamlined POJO model and XML schema to allow powerful integration solutions to be quickly built around highly specific use cases in a standardized, logical manner.
Spring and Mule both boast some of the fastest development to production times in the industry. Spring offers excellent integration between Spring applications, and many organizations have rebuilt their entire infrastructures to take advantage of these features.
However, the framework is not designed to handle the complex integration and SOA scenarios in which Mule is known to excel. Using Mule as an ESB with Spring enables teams to build on Spring’s integration capabilities, retaining the value of previous work while implementing additional features such as an extensive library of transports and transformers, powerful routing, orchestration, and governance libraries for the execution of SOA strategies, and massively scalable messaging for mission critical high throughput environments.
Mule’s powerful error and transaction management is battle-tested in over 2,500 production deployments, including many major financial organizations. Mule combined with Spring, represents one of the most versatile, reliable and proven integration solutions in the industry. Get more skills from Mule Training
Mule ESB vs. Spring integration
Recently, a new component called Spring Integration was added to the Spring Portfolio, which allows ESB-like functionalities and EIPs to be created and managed within the Spring Framework.
Spring Integration takes what is known as an “application-centric” approach to integration. Rather than implement a shared bus, which allows all integration and messaging between components and systems to be managed, administered, and configured centrally, Spring Integration is aimed at providing “just a little” ESB-style integration to specific applications by providing frameworks for implementing common EIPs such as a message bus and simple routing. Due to its limited scope, Spring Integration is best suited to situations where a small number of components must be integrated, usually internally, and the infrastructure in question is made up of a large number of other Spring components.
For anything more complicated, the lack of a common bus, coupled with the very small number of supported transports and transformers available for the young project makes Spring Integration unsuited for the task. The advantage of using Mule as an ESB to handle integration in a Spring environment is that Mule as an ESB is not simply an ESB – it is an integration platform.
Whereas the scope of Spring Integration is deliberately limited to small-scale integration within the Spring Portfolio context, Mule’s intentionally modular architecture allows teams to quickly deliver the lightest possible integration solution for any scenario, from simple point to point integration to complicated SOA, cloud and partner ecosystem scenarios.
About Mule ESB
Mule as an ESB is the world’s most widely used open source enterprise service bus, with over 1.5 million downloads and 2,500 production deployments.
With Mule as an ESB’s simplified development model and lightweight architecture, developers can be productive in minutes, easily creating and integrating application services.
Mule as an ESB takes the complexity out of integration, enabling developers to easily build high-performance, secure, multi-protocol interactions between heterogeneous systems and services. Mule’s rock solid standards-compliant, format-agnostic approach to integration, active open-source community of integration specialists, and aggressive roadmap make it the integration platform of choice for organizations that take a “big picture” approach to their infrastructure.
Some of the real-world integration benefits of Mule as an ESB include:
Support for more than 30 protocols and technologies
Simplified POJO-based programming model leveraging existing developer skill-sets for fast deployment
Support for multiple access points such as JMS, JDBC, and SOAP
No reliance on vendor-specific proprietary protocols
Ease of use – services can be configured easily in one configuration file.
Extensive data transformations out of the box
Small footprint: memory and disk, no application server required
Integration platform model: highly modular, easily extensible codebase – implement proven patterns and build streamlined solutions to unique challenges
The open source advantage: large community of real-world integration experts and developers using Mule and contributing to codebase
Mulesoft’s Anypoint CloudHub is the iPaaS that provides auto-scaling Mulesoft runtimes and other associated services for the entire infrastructure. CloudHub offers HA by default when any integration application is deployed on to the runtimes of Anypoint CloudHub.
The underlying AWS services provide the HA based on the number of workers you assign to the application/integration.
One of the crucial components that helps in achieving this is the “load balancer.” As an organization, you may use the public load balancer that is available to any of the application deployed on CloudHub runtimes. This, however, comes with the default CloudHub domain, “<your-vpc-region>.cloudhub.io.”
The other approach — a more appropriate and most used one — is to have a custom domain name for your organization application. For more info Mulesoft Training
And this is logical as well. If you have services and applications that are specific to your organization, you will want to have a custom domain name and not use the default CloudHub’s domain.
The other important features this would provide are the abilities to configure your own custom routing rules, TLS certificates, and firewall rules for your own custom load balancer, amongst other things.
The custom load balancer, however, comes at a price. This CloudHub LB has to be purchased separately in addition to the base Mulesoft CloudHub licenses and VPCs.
Another aspect is CloudHub essentially uses AWS services and infrastructure under the hood. An organization might already have an AWS account and a subscription and might want to make use of it.
One of the ways to leverage the AWS is to use the load balancer from AWS to front the CloudHub workers.
The below section explores the option of using the gateway and network services available in AWS to construct a custom domain and gateway for the CloudHub VPC and applications on it. Learn more skills from Mule Training
As the diagram explains, the applications deployed on workers in the Mulesoft Anypoint CloudHub are accessed only by allowing the traffic to the CloudHub from the AWS VPC and the private subnets on AWS VPC.
The two VPC’s are peered using VPC peering. The AWS VPC is a standard setup having private and public subnets with AWS Internet Gateway.
The load balancing and HA is achieved by using the Public and Private ELB setups on AWS Public and Private ELBs, and the NGINX workers direct the traffic to the applications instances on CloudHub.